Technology Support for iPads
Overview
- iPads are managed by a cloud-based management system known as Workspace ONE (prior to 2018, this product was known as AirWatch).
- Although we only use Workspace ONE to manage iPads, it can also be used to manage mobile devices from other vendors such as Google and Microsoft. Because we only use a limited subset of the features of Workspace ONE, there will be many configuration options which can be ignored.
- iPads pull configuration changes and send status updates to Workspace ONE at regular intervals, but this can be interrupted if the iPad is in sleep mode or has no connection to the Internet. Therefore, changes are often not pushed immediately and the status information you view in Workspace ONE, will not always be accurate.
- Because the iPads are made by Apple and Workspace ONE is made by VMware, there will be some discrepancies in how the products work together. Apple may refer to a particular feature by one name and VMware might call that feature a similar, but different name. Also, if you run into a problem and you search on Apple's support website, you will not find any information related to using Workspace ONE. However, there are thousands of organizations that manage iPads with Workspace ONE, so if you do a Google search on an error message or other issue, you are very likely to find helpful information.
- If you notice a mistake in any of these instructions or something doesn't make sense, please send an email to ipads@desalesmedia.org so that we can correct it.
- For any questions not answered below, the best way to get help is to send an email to desales-grant-device-management@googlegroups.com.
You must be a member of the group to email/post a new discussion topic (you will get a bounce-back email notification if you are not).
If you are not a member of this group and you would like to be, please send an email to ipads@desalesmedia.org. You can view
previous discussion threads here.
Frequently Asked Questions
Workspace ONE Basics
- I'm new to Workspace ONE. How can I learn more about it?
- How do I get an account to login to Worksapce ONE?
- Can we have two people at our school with logins to Workspace ONE?
- I forgot my password to Workspace ONE.
- What does it mean to enroll an iPad? What username and password should I use?
- In Workspace ONE, I see an iPad with STAGING in the name. What does that mean?
- What is the Hub app? How is it used?
- What is the Catalog app? How is it used?
- Is it possible for me to see what would display in the Catalog app on an iPad?
- What is an Organization Unit (OU)?
- What is an Assignment Group? What is a Smart Group?
- What is the Cisco Security Connector app?
- When I open the Hub app, it prompts me to enter en Email Address or Server or to scan a QR Code.
Workspace ONE Features
- How can I reset the passcode on an iPad?
- When students try to use Google Classroom, they get a message saying they need to add a passcode to the iPad.
- What is a Profile? Can I modify it?
- Is it possible to block students from accessing certain websites on the iPads?
- What are Compliance Policies? What does it mean if an iPad is Not Compliant?
- What number or name should I use to uniquely identify each iPad?
- How can I set a background image on the Home Screen or the Lock Screen?
- Someone enabled Guided Access on an iPad; how do I disable it?
- Can I control the Home Screen Layout and put apps into folders?
- My school was given an Emergency Grant of iPads in 2020 during the Covid-19 pandemic. Can I modify Profiles or deploy apps to those iPads?
Apple School Manager (ASM)
- How do I get an account to login to Apple School Manager?
- Could I create an account for DeSales Media in my school's Apple School Manager?
- What is my school's Apple Customer Number?
- I forgot my password to Apple School Manager (ASM).
- How do I purchase or download apps from Apple School Manager?
- I received an email from Apple with the subject line: Verify ownership of domain...
Downloading & Deploying Apps
- What is a VPP token and how is it used?
- How do I install a VPP token for the first time?
- How do I renew my VPP token?
- How do I deploy an app to all iPads at my school?
- How do I deploy an app only to a subset of iPads at my school?
- I deployed an app, but I don't see it on an iPad.
- Could you tell me if a certain app or feature is enabled or disabled on our iPads?
- I'm having trouble updating the i-Ready Connect app.
- Why are there two apps with similar names in the Workspace ONE list?
Hardware Troubleshooting
- The screen cracked on one of my iPads? Can I get it replaced?
- The case and/or power supply of one of the iPads is lost or broken. Can I get it replaced?
- Is this iPad covered by an AppleCare Warranty? If so, what type of issues can they help with?
- What headsets or other accessories do you recommend?
- Can I pair a Bluetooth device to an iPad?
- Should I update the version of iOS on my iPads? How do I do that?
- What can I do if I'm running out of storage space on one or more iPads?
- Can we sell or give away some of the iPads we received from DeSales?
- Can I (or a student or teacher) take an iPad to an Apple Store to ask for technical support?
- I'm getting a message: Your SIM cannot be accessed. Please call your carrier to obtain your PUK code.
- I had a connector in the 3.5 mm headphone jack, but when I pulled it out, the connector broke off and is now stuck in the jack.
Lost or Stolen Devices
- What is Lost Mode? How can I enable or disable it?
- Can I view the GPS location of an iPad? Can I view the location for all of my iPads at once?
- If I cannot find an iPad, but I think it is nearby, can I have it play a sound to help me locate it?
- One of our iPads was lost or stolen. Could we get a replacement?
Wiping An iPad
- What is the difference between Device Wipe and Enterprise Wipe?
- How can I perform a Device Wipe?
- How can I perform a Device Wipe on an iPad which cannot access the Internet?
- I just wiped an iPad, but I'm not sure which enrollment ID to use to re-enroll it.
Miscellaneous
- How can I take a screen capture on an iPad?
- Can iPad users login with their own Apple ID? Should I have multiple users use a shared Apple ID?
- Our school acquired several iPads from somewhere other than DeSales Media. Is it possible for us to add them to Workspace ONE so they can be managed with our existing iPads?
- App Installation: Sign in to iTunes to allow ds420.awmdm.com to manage and install the apps.
Answers
I'm new to Workspace ONE. How can I learn more about it?
You can view a 58 minute video tutorial on using Workspace ONE that was recorded in September of 2020 here:
https://vimeo.com/454498108.
Another training session was held in October of 2022: https://vimeo.com/765098366/fdf32e09cd.
Another training session was held in October of 2022: https://vimeo.com/765098366/fdf32e09cd.
How do I get an account to login to Worksapce ONE?
If you are just receiving iPads for the first time and you do not have a login account, please email ipads@desalesmedia.org and
copy ctn@desalesmedia.org and your principal and we will create an account for you.
If your school has had iPads, but someone else previously managed them, try to ask that person or your principal for the login
credentials.
Can we have two people at our school with logins to Workspace ONE?
Yes. If multiple people at your school will be managing iPads, we recommend that each person have their own login account to
Workspace ONE. Please email ipads@desalesmedia.org and copy ctn@desalesmedia.org and your principal and we will create an account
for you.
I forgot my password to Workspace ONE.
Please email ipads@desalesmedia.org and be sure to let us know the username that you use to login to Workspace ONE.
What does it mean to "enroll" an iPad? What username and password should I use?
You enroll an iPad when you open the Hub app and login using the enrollment credentials. For most iPads, they are enrolled when they
are initially deployed and their enrollment doesn't ever change. However, if you ever perform a Device Wipe,
you will need to re-enroll the iPad.
Each school is assigned a four or five character abbreviation for their school name which is used in the enrollment account. For example, enrollment accounts for student iPads at Good Shepherd Catholic Academy are: GSCA-STUD001, GSCA-STUD002, GSCA-STUD003, etc. And teacher iPads are enrolled with accounts: GSCA-TEAC001, GSCA-TEAC002, GSCA-TEAC003, etc.
Each enrollment account can only be used to enroll one iPad. If you try to enroll an iPad using an account that has already been used to enroll another iPad, you will receive an error which states: "The Operation couldn't be completed." If you perform a Device Wipe on an iPad, that enrollment account is "released" and can be used to enroll that same iPad or a different iPad.
In Workspace ONE, I see an iPad with STAGING in the name. What does that mean?
The most likely reason for this is that someone did a factory reset (either by issuing the Device Wipe command from Workspace ONE
or by choosing Reset All Content and Settings from the iPad under Settings, General, Reset) and did not
re-enroll the iPad. As soon as you re-enroll the iPad, the name will change to the enrollment username.
What is the Hub app? How is it used?
The Hub (aka Intelligent Hub) app  is one of two apps that are installed automatically the first time each iPad
is powered on. The Hub app is used to enroll the iPad (which installs all other apps). The Hub app requires iOS version 12.2, so if you
are running an older version of iOS, you should upgrade as soon as possible.
is one of two apps that are installed automatically the first time each iPad
is powered on. The Hub app is used to enroll the iPad (which installs all other apps). The Hub app requires iOS version 12.2, so if you
are running an older version of iOS, you should upgrade as soon as possible.
If you open the Hub app, you can see the enrollment account ID and also the date and time when the app last checked in with Workspace ONE (if you do not see that, tap the left-pointing-arrow in the upper left corner of the screen).
You can also use the Hub app to test connectivity to Workspace ONE by tapping on This Device and then tapping Send Data.
If you open the Hub app and it prompts you to enter a username and password (the enrollment credentials), but you do not know what to enter, send an email to ipads@desalesmedia.org and include the serial number of the iPad.
If you do not see the Hub app on an iPad, open Settings and look in the upper left corner. You should see a message like this:
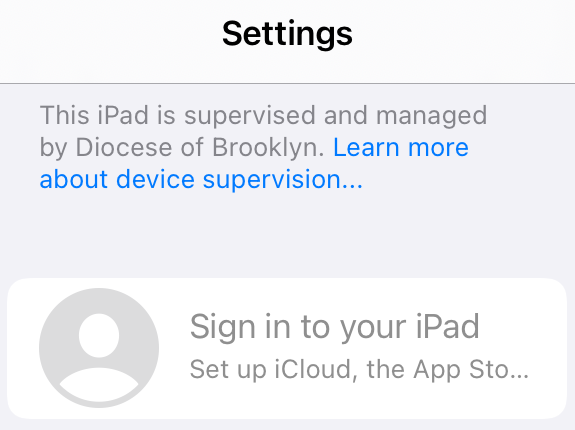
If you do not see a message like that, this iPad was not provided by or managed by DeSales Media.
is one of two apps that are installed automatically the first time each iPad
is powered on. The Hub app is used to enroll the iPad (which installs all other apps). The Hub app requires iOS version 12.2, so if you
are running an older version of iOS, you should upgrade as soon as possible.If you open the Hub app, you can see the enrollment account ID and also the date and time when the app last checked in with Workspace ONE (if you do not see that, tap the left-pointing-arrow in the upper left corner of the screen).
You can also use the Hub app to test connectivity to Workspace ONE by tapping on This Device and then tapping Send Data.
If you open the Hub app and it prompts you to enter a username and password (the enrollment credentials), but you do not know what to enter, send an email to ipads@desalesmedia.org and include the serial number of the iPad.
If you do not see the Hub app on an iPad, open Settings and look in the upper left corner. You should see a message like this:
If you do not see a message like that, this iPad was not provided by or managed by DeSales Media.
What is the Catalog app? How is it used?
The Catalog app  is one of two apps that are installed automatically the first time each iPad
is powered on. It shows each app which has been assigned to the iPad along with its installation status. Users can also manually
install apps from the Catalog app if they are not automatically deployed from Workspace ONE.
is one of two apps that are installed automatically the first time each iPad
is powered on. It shows each app which has been assigned to the iPad along with its installation status. Users can also manually
install apps from the Catalog app if they are not automatically deployed from Workspace ONE.
The Catalog app is a useful troubleshooting tool when deploying apps, because if you are expecting an app to be deployed to an iPad, but you do not see it in the Catalog, then most likely the app is not deployed correctly. If you do see the app in the Catalog, but it is not installed on the iPad, it may be due to one of the following:
is one of two apps that are installed automatically the first time each iPad
is powered on. It shows each app which has been assigned to the iPad along with its installation status. Users can also manually
install apps from the Catalog app if they are not automatically deployed from Workspace ONE.The Catalog app is a useful troubleshooting tool when deploying apps, because if you are expecting an app to be deployed to an iPad, but you do not see it in the Catalog, then most likely the app is not deployed correctly. If you do see the app in the Catalog, but it is not installed on the iPad, it may be due to one of the following:
- Slow Internet bandwidth: recommended to connect to a Wi-Fi network with a fast and reliable Internet connection
- Lack of available storage space on the iPad: recommended to remove unneeded apps or media files
- Unsupported version of iOS: recommended to upgrade the iOS on the iPad
- Other reason which cannot be explained: recommended to perform a Device Wipe on the iPad
Is it possible for me to see what would display in the Catalog app on an iPad?
Yes. This will be available in the summer of 2021:
http://172.16.20.17/fishbowl/catalog.php
What is an Organization Unit (OU)?
Workspace ONE uses a hierarchical structure for its configuration - similar to branches on a tree. Each school has an Organizational
Unit (OU), which is like a container for its devices, Profiles, Smart Groups, and apps. Within each
school's OU are sub-OUs
for Students and Teachers. Some schools also have an OU for Chromebooks, but these were only created for testing; we ultimately decided
not to use Workspace ONE to manage Chromebooks.
The administrator at each school has an account which has permissions to view everything within the school's OU and also within all sub-OUs. The administrator cannot view elements associated with other branch OUs or higher-level OUs, because they belong to other schools.
At the top level, is an OU for DeSales Media Group and at this level, there are Smart Groups, policies, and apps which are assigned to your school, but you do not have the ability to modify them. For example, in the image below, you can see two Assignment Groups which are managed at the DeSales Media Group level.
What is an Assignment Group? What is a Smart Group?
The primary purpose of an Assignment Group is to identify a group of devices to which an app or
Profile will be assigned. There are two types of Assignment Groups: Smart Groups (membership is dynamic
and varies based on elements of the device or user) and Organizational Units (membership
is determined based on where the device exists in the OU structure.
To add, view, or modify Assignment Groups, login to Workspace ONE, click Groups & Settings (in the menu column on the left), click Groups, and then click Assignment Groups. You can create as many Smart Groups as you like for your school. A common use of Smart Groups it to create one group for each app that you deploy. You assign the app to the Smart Group and then you can add only the iPads to the Smart Group which need the app. This prevent you from having to deploy every app to every iPad and saves storage space on the iPads.
To add, view, or modify Assignment Groups, login to Workspace ONE, click Groups & Settings (in the menu column on the left), click Groups, and then click Assignment Groups. You can create as many Smart Groups as you like for your school. A common use of Smart Groups it to create one group for each app that you deploy. You assign the app to the Smart Group and then you can add only the iPads to the Smart Group which need the app. This prevent you from having to deploy every app to every iPad and saves storage space on the iPads.
What is the Cisco Security Connector app?
It prevents anyone from accessing inappropriate content (pornography, gambling, hate speach, etc.) on the Internet - even if the user is
trying to hide their activity through the use of encryption or a proxy server. It enforces security regardless of how or from where the
iPad is connecting to the Internet. Although this is a very good security tool, a creative and determined individual could potentially
find a way around it.
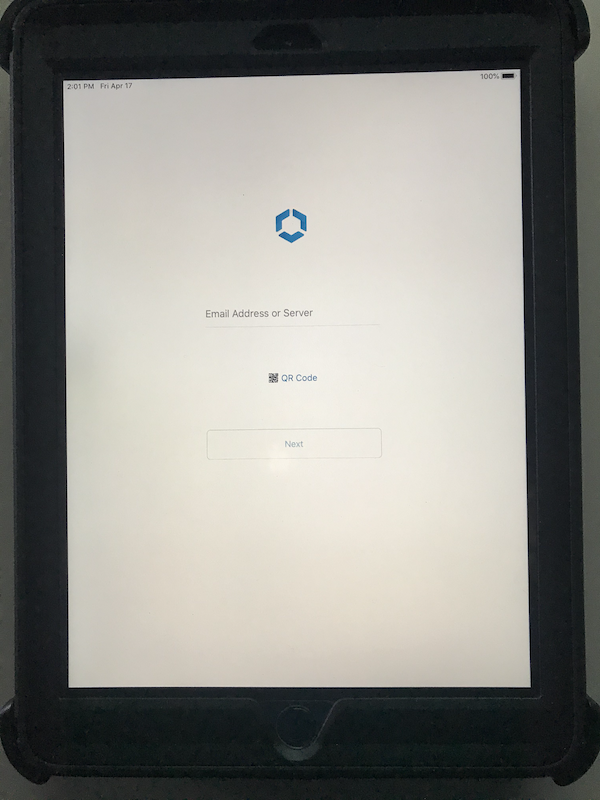
When I open the Hub app, it prompts me to enter an Email Address or Server or to scan a QR Code.
This happens when the iPad has become deprovisioned from Workspace ONE. Typically, the only way to resolve this issue is to wipe and
re-enroll the iPad. Because it has lost its ability to communicate with Workspace ONE, you must wipe it manually from the iPad.
From the Home Screen, tap Settings, then General, then Reset, and then choose Erase All Content and Settings. Once the iPad reboots, it will automatically install the Hub app and it will have re-established its communication to Workspace ONE, so you will be able to re-enroll the iPad.
Occationally, when the iPad is in this state, it will automatically begin a software update of several installed apps. You must wait until this software update completes before you can Erase All Content and Settings. The software update will complete faster if you connect the iPad to a Wi-Fi network.
If this doesn't resolve the issue, or if you do not see the option to Erase All Content and Settings in the Reset menu, then you will need to send an email to ipads@desalesmedia.org with the serial number and a description of the steps you have tried so far.
How can I reset the passcode on an iPad?
From Workspace ONE, click on Devices (in the menu on the left), click List View, click the name of the iPad, click More Actions
(in the far upper right), under the heading Clear Passcode, choose Device.
When students try to use Google Classroom, they get a message saying they need to add a passcode to the iPad.
When trying to use Google Classroom, students may see a message which states "Your org requires you to set a passcode on this device...".
There are two ways you could solve this problem: 1. Log into Google Admin and
remove the requirement for a passcode. 2. Log into
Workspace ONE and allow a passcode to be set on student iPads.
The downside to allowing students to set passcodes on their iPads is that inevitably, some students will forget their passcode and you will end up spending a lot of time resetting passcodes. The easier solution is to log into https://admin.google.com, click Device Management, Password Settings, and uncheck the box for Require Users to Set a Password.
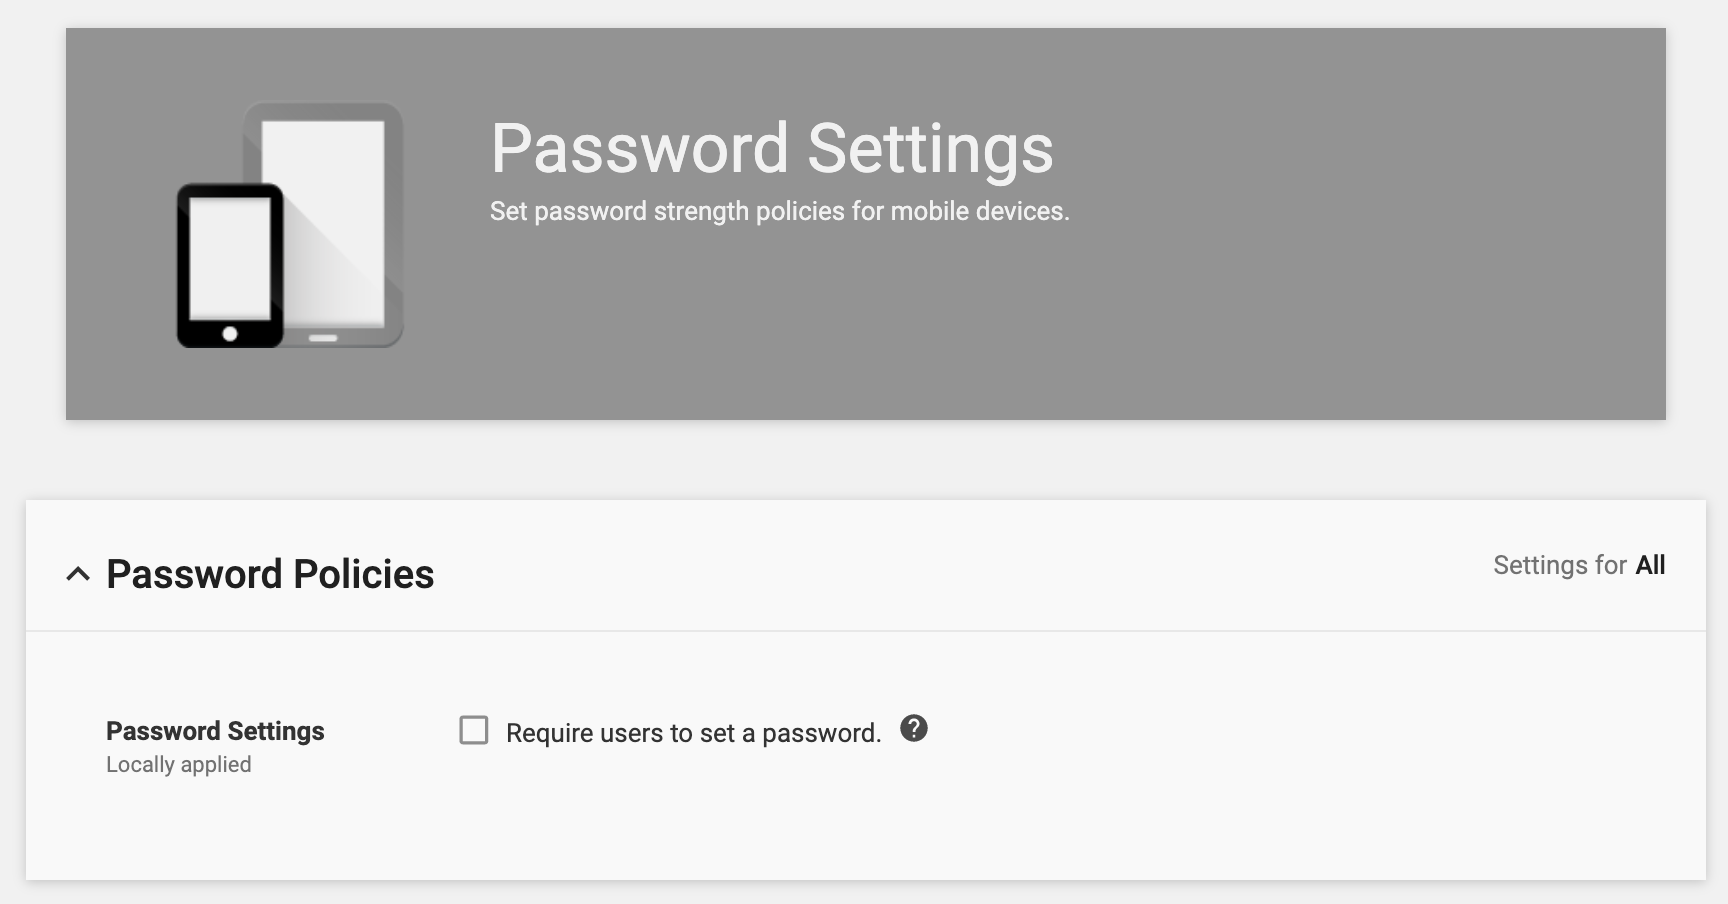
The downside to allowing students to set passcodes on their iPads is that inevitably, some students will forget their passcode and you will end up spending a lot of time resetting passcodes. The easier solution is to log into https://admin.google.com, click Device Management, Password Settings, and uncheck the box for Require Users to Set a Password.
What is a Profile? Can I modify it?
Profiles are used to enable or disable features or restrictions on an iPad (such as requiring a passcode or disabling the camera). Profiles
are assigned to devices via Assignment Groups; multiple Profiles can be applied to an iPad.
If the Profiles have conflicting configurations associated with them, it can be difficult to troubleshoot why a device is behaving in a certain way. Therefore, in order to simplify things, we do not have any Profiles applied to devices from the top organizational level.
To view or modify Profiles, click Devices (from the navigation menu on the left) and click Profiles & Resources and then click Profiles. Each school has two Profiles by default: one for student iPads, and one for teacher iPads. The Profile's name includes the four or five character abbreviation for each school. For example, the Profile for the student iPads at Divine Mercy Catholic Academy is called DMCA - Student Profile - Restrictions (the name may be truncated depending on the size of your window). Click on the name of the Profile and then click the green "Restrictions" on the left side.
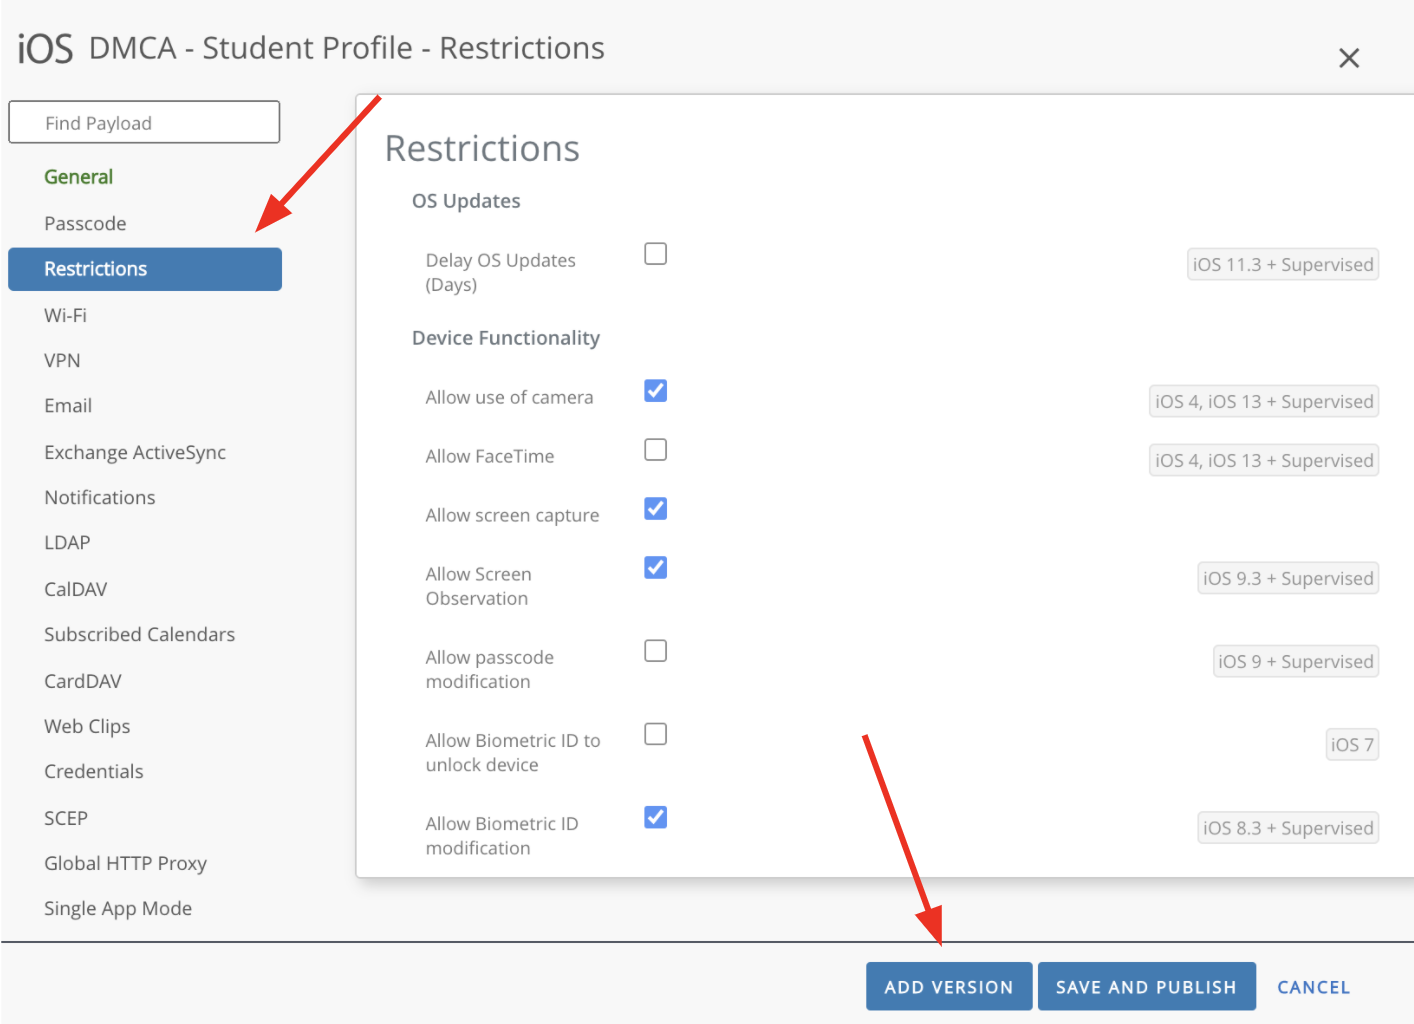
If you see at bottom at the bottom which says Add Version, then you should click it. You will not always see it. It may not be obvious, but you can scroll down in this window to view additional options. There are over 100 configurable options within the Restrictions section. If you have questions about how a particular restriction works, send an email to desales-grant-device-management@googlegroups.comm or you could just do a Google search and you will likely find some additional information.
If you modify a Restriction option, click Save And Publish and then click Publish. Workspace ONE will try to push this change out to all affected iPads, but it might not go into effect immediately on all iPads. From an iPad, you can force it to download an updated Profile by tapping on the Hub app, tapping This Device, and then Send Data (if you do not see This Device, then tap the left-pointing arrow in the upper left corner).
If the Profiles have conflicting configurations associated with them, it can be difficult to troubleshoot why a device is behaving in a certain way. Therefore, in order to simplify things, we do not have any Profiles applied to devices from the top organizational level.
To view or modify Profiles, click Devices (from the navigation menu on the left) and click Profiles & Resources and then click Profiles. Each school has two Profiles by default: one for student iPads, and one for teacher iPads. The Profile's name includes the four or five character abbreviation for each school. For example, the Profile for the student iPads at Divine Mercy Catholic Academy is called DMCA - Student Profile - Restrictions (the name may be truncated depending on the size of your window). Click on the name of the Profile and then click the green "Restrictions" on the left side.
If you see at bottom at the bottom which says Add Version, then you should click it. You will not always see it. It may not be obvious, but you can scroll down in this window to view additional options. There are over 100 configurable options within the Restrictions section. If you have questions about how a particular restriction works, send an email to desales-grant-device-management@googlegroups.comm or you could just do a Google search and you will likely find some additional information.
If you modify a Restriction option, click Save And Publish and then click Publish. Workspace ONE will try to push this change out to all affected iPads, but it might not go into effect immediately on all iPads. From an iPad, you can force it to download an updated Profile by tapping on the Hub app, tapping This Device, and then Send Data (if you do not see This Device, then tap the left-pointing arrow in the upper left corner).
Is it possible to block users from accessing certain websites on the iPads?
Yes. But this feature has its limitations: you cannot block access during school hours and allow access after hours, you must manually
enter each domain or URL, etc. Enabling this feature could easily lead to more problems that it is solving, but here are the steps to
enable it:

Here is a link to documentation related to this feature: https://docs.vmware.com/en/VMware-Workspace-ONE-UEM/2008/iOS_Platform/GUID-740093C6-ED7F-45C6-8B7F-3C37866B8360.html.
- Login to Workspace ONE
- Click Devices (far left), then Profiles & Resources, and then click Profiles.
- Click the profile you want to modify; which is probably xxxx - Student Profile - Restrictions (where the xxxx is an abbreviation for your school).
- Click the Add Version button in the lower right corner of the window that opens (next to the Save & Publish button, but if you do not see a button labeled Add Version, that is fine; you can ignore this step)
- Click Content Filtering in the list on the left and then click Configure
- In the Filter Type dropdown menu, choose Built-in: Deny Websites
- In the blacklisted URLs box, enter the domain(s) and/or URL(s): "facebook.com instagram.com" (separate each with a new line, space, or comma).
- Click Save & Publish, then click Publish
- It should be applied within an hour to any iPad that is powered on and connected to the Internet; on any iPad, you can open the Hub app, tap This Device and then Send Data and that should apply it right away.
- Be sure to test it. You should see a message that says "Restricted Site".
Here is a link to documentation related to this feature: https://docs.vmware.com/en/VMware-Workspace-ONE-UEM/2008/iOS_Platform/GUID-740093C6-ED7F-45C6-8B7F-3C37866B8360.html.
What are Compliance Policies? What does it mean if an iPad is Not Compliant?
Most schools do not use them, but you could use them if you want to. You could optionally create a policy which says "All iPads
must be at iOS version 13.0 or higher". Then as you look in the Device List, you could easily see which devices were Not Compliant.
You could create multiple policies on any number of possible configuration, device, or user parameters.
If you would like to learn more about using them, either send an email to desales-grant-device-management@googlegroups.com or try doing a Google search on "How to use compliance policies for iPads in Workspace ONE".
If you would like to learn more about using them, either send an email to desales-grant-device-management@googlegroups.com or try doing a Google search on "How to use compliance policies for iPads in Workspace ONE".
What number or name should I use to uniquely identify each iPad?
There are three different numbers/names you could use, and depending on the purpose, you might want to you one or more.
- Serial Number: always 12 characters and a mix of letters and numbers. The first four characters will always be letters and the first two letters are almost always DM or GG. The only way to see the serial number on the iPad is to tap Settings, then General, and then About. The serial number is also laser etched on the back of the iPad, but it is VERY small and VERY difficult to read - and if there is a case on the iPad it will most likely be covered. You can search for a device by the serial number in Workspace ONE.
- Enrollment Name: this is the username that is logged into the Hub app on the iPad. This name was typically chosen by DeSales Media Group and we often use the format xxxx-STUD001 where the xxxx is a three or four letter abbreviation for the location or school. You cannot use an enrollment ID to login to more than one iPad, so every iPad will have its own enrollment ID, but the enrollment ID is not "fixed" to an iPad, so if you do a Device Wipe, you can then use any available enrollment ID to login (but you should always try to use the same one to avoid confusion.) We recommend that you use a label maker to print the enrollment ID and affix it to the front of the iPad, because this is the easiest way to identify an iPad in Workspace ONE. If you ever ask someone at DeSales Media for help troubleshooting something on an iPad, usually the first thing we need to know is the enrollment ID. If you do not know the enrollment ID of an iPad, just open the Hub app and you will see it at the top.
- Asset Tag: there will be a sticker on the back of all iPads which say "Property of DeSales Media ####-#####". We have used a few different formats over the years, but the first four characters are typically the year and there might be a letter in it also. The asset tag is unique to each iPad. You cannot find the asset tag anywhere in the iPad operating system or apps and you cannot search for it in Workspace ONE.
How can I set a background image on the Home Screen or the Lock Screen?
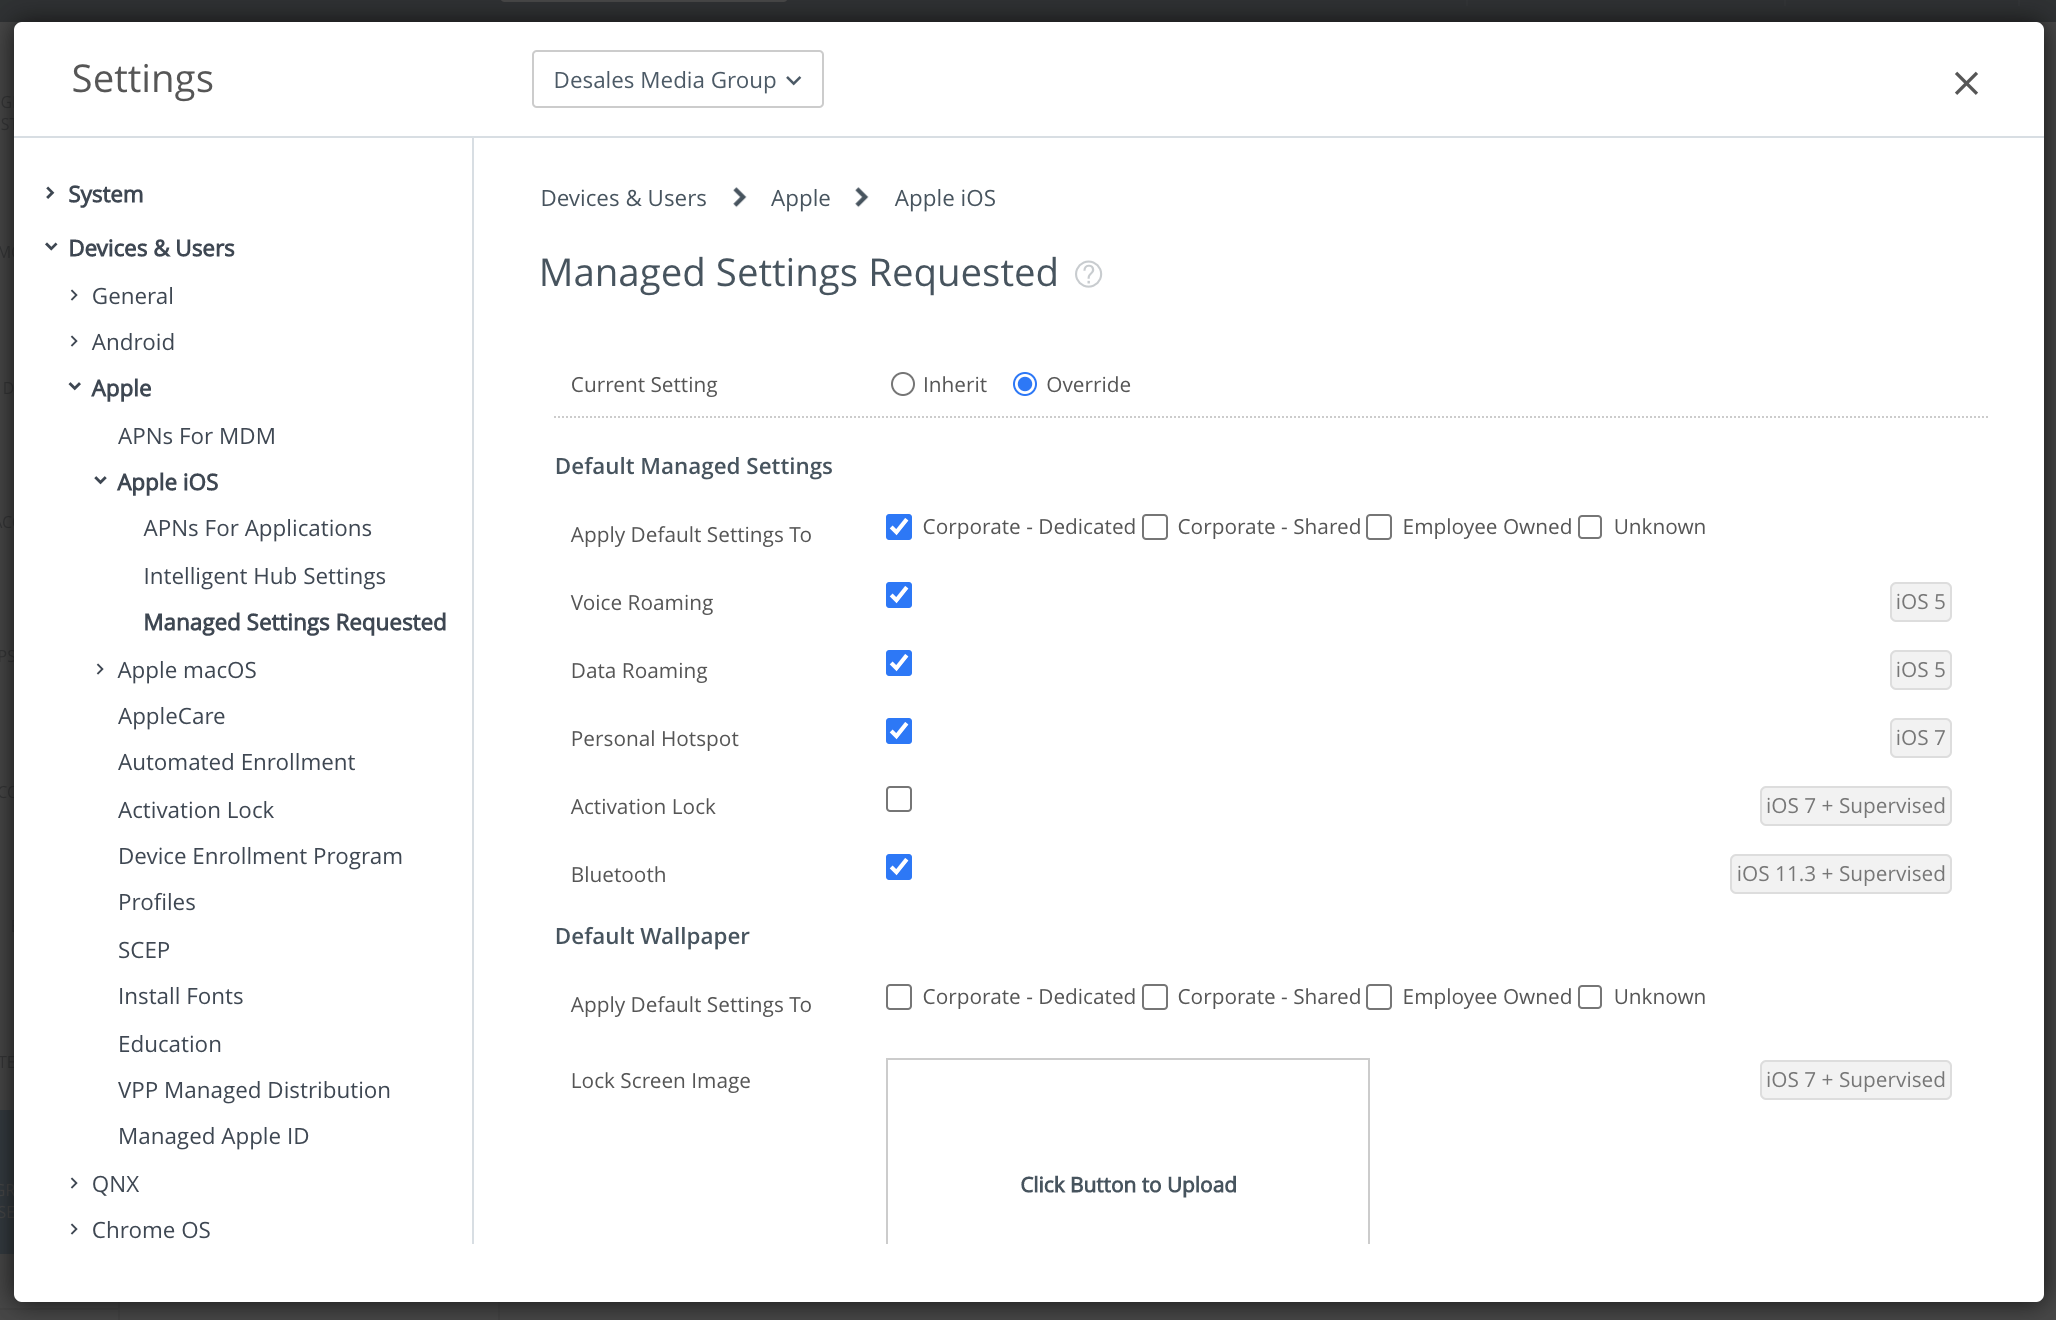
To set a Home Screen image or Lock Screen image, login to Workspace ONE and navigate to Groups & Settings (in the menu on the left), then
choose All Settings. A new window will pop up and at the very top will be a drop-down box which probably has your school name by default;
if you keep this setting, the image will be applied to all of your iPads. You could also optionally choose Student or Teacher to only
have the image apply to those devices. You cannot have a different image on every iPad or a sub-set of iPads. Click Devices & Users (on
the left), then click to expand Apple and then Apple iOS, and then click Managed Settings Requested.
Click the "Override" option next to Current Settings. In the Default Wallpaper section, check the box for "Corporate - Dedicated" (you can check the other three boxes too, but I don't think it is necessary). Ideally, you want to choose an image that is 1536 x 2048 pixels (otherwise the image will be automatically stretched or shrunk to that size) and the max size is 4MB.
Click the "Override" option next to Current Settings. In the Default Wallpaper section, check the box for "Corporate - Dedicated" (you can check the other three boxes too, but I don't think it is necessary). Ideally, you want to choose an image that is 1536 x 2048 pixels (otherwise the image will be automatically stretched or shrunk to that size) and the max size is 4MB.
Someone enabled Guided Access on an iPad; how do I disable it?
Guided Access is an accessibility feature that locks the iPad
into using a single app and could also disable certain
features in that app. When enabled, it prompts you to enter a passcode which will be used to unlock it - this is different
from the passcode which unlocks the iPad after a period of inactivity (which is not enabled on Student iPads). Although you
can clear the normal
passcode from Workspace ONE, you cannot clear the Guided Access passcode from Workspace ONE. If you enable Guided Access, you
cannot do a normal reboot of the iPad, but you can do a hard reset, by holding down the power and home buttons for
five seconds. However, if you do a hard reset, when it reboots, it will automatically re-enable Guided Access.
If the person who enabled Guided Access forgets the passcode, the only option we have found is to do a Device Wipe or a Restore.
I also looked into trying to completely disable the Guided Access feature using a Policy in Workspace ONE, but apparently this is not supported.
If the person who enabled Guided Access forgets the passcode, the only option we have found is to do a Device Wipe or a Restore.
I also looked into trying to completely disable the Guided Access feature using a Policy in Workspace ONE, but apparently this is not supported.
Can I control the Home Screen Layout and put apps into folders?
Yes, by configuring the Home Screen Layout feature within a Profile. By default, each school has two profiles:
one for Student iPads and one for Teacher iPads. The profile names each begin with the three or four character abbreviation of your school name.
As an example, the profile names for Blessed Sacrament Catholic Academy are BSCA - Student Profile - Restrictions and
BSCA - Teacher Profile - Restrictions.
You could create a new profile for the Home Screen Layout configurations, but it would be easier to add the configurations to either the existing Student or Teacher profile. If you wanted to apply different Home Screen Layout configurations to certain iPads, you would create a Smart Group for those iPads and then create a new Profile and assign the Profile to that Smart Group.
You could create a new profile for the Home Screen Layout configurations, but it would be easier to add the configurations to either the existing Student or Teacher profile. If you wanted to apply different Home Screen Layout configurations to certain iPads, you would create a Smart Group for those iPads and then create a new Profile and assign the Profile to that Smart Group.
- Login to Workspace ONE.
- Click Devices (in the menu on the left), then click Profiles & Resources, and then click Profiles.
- Find the profile you want to modify and click its name.
- If you see a button in the lower right that says Add Version, then click that button.
- Scroll down the list on the left side and click Home Screen Layout and then click Configure.
- Add apps to the dock (the bottom row of apps on the Home Screen), add pages, and add folders as needed.
- Click the Save and Publish button in the lower left, then click Publish.
My school was given an Emergency Grant of iPads in 2020 during the Covid-19 pandemic. Can I modify Profiles or deploy apps to those iPads?
If you do not see the iPads in your school's Organization Unit (OU) in Workspace ONE, then you will not be
able to modify Profiles or deploy apps to them. Send an email to ipads@desalesmedia.org and copy ctn@desalesmedia.org and request
that we move your iPads into your school's OU.
How do I get an account to login to Apple School Manager?
If anyone at your school has ever logged into Apple School Manager before,
then ask that person or your principal.
If no one at your school has ever logged in before, then send an email to ipads@desalesmedia.org and copy ctn@desalesmedia.org and
your principal and we will contact Apple to have them create an account for you (this usually takes 3-5 days).
Could I create an account for DeSales Media in my school's Apple School Manager?
Yes! We recommend that because it makes another backup account in the event everyone at your school forgets their password. Also, someone at
DeSales can update your VPP token when needed, or help you with any issues related to deploying apps.
We need to create an account in @desalesmedia.org for you to use; please send an email to ipads@desalesmedia.org and let us know you would like to create an ASM account for us and we will respond with the details. Once you have it, you can follow these steps: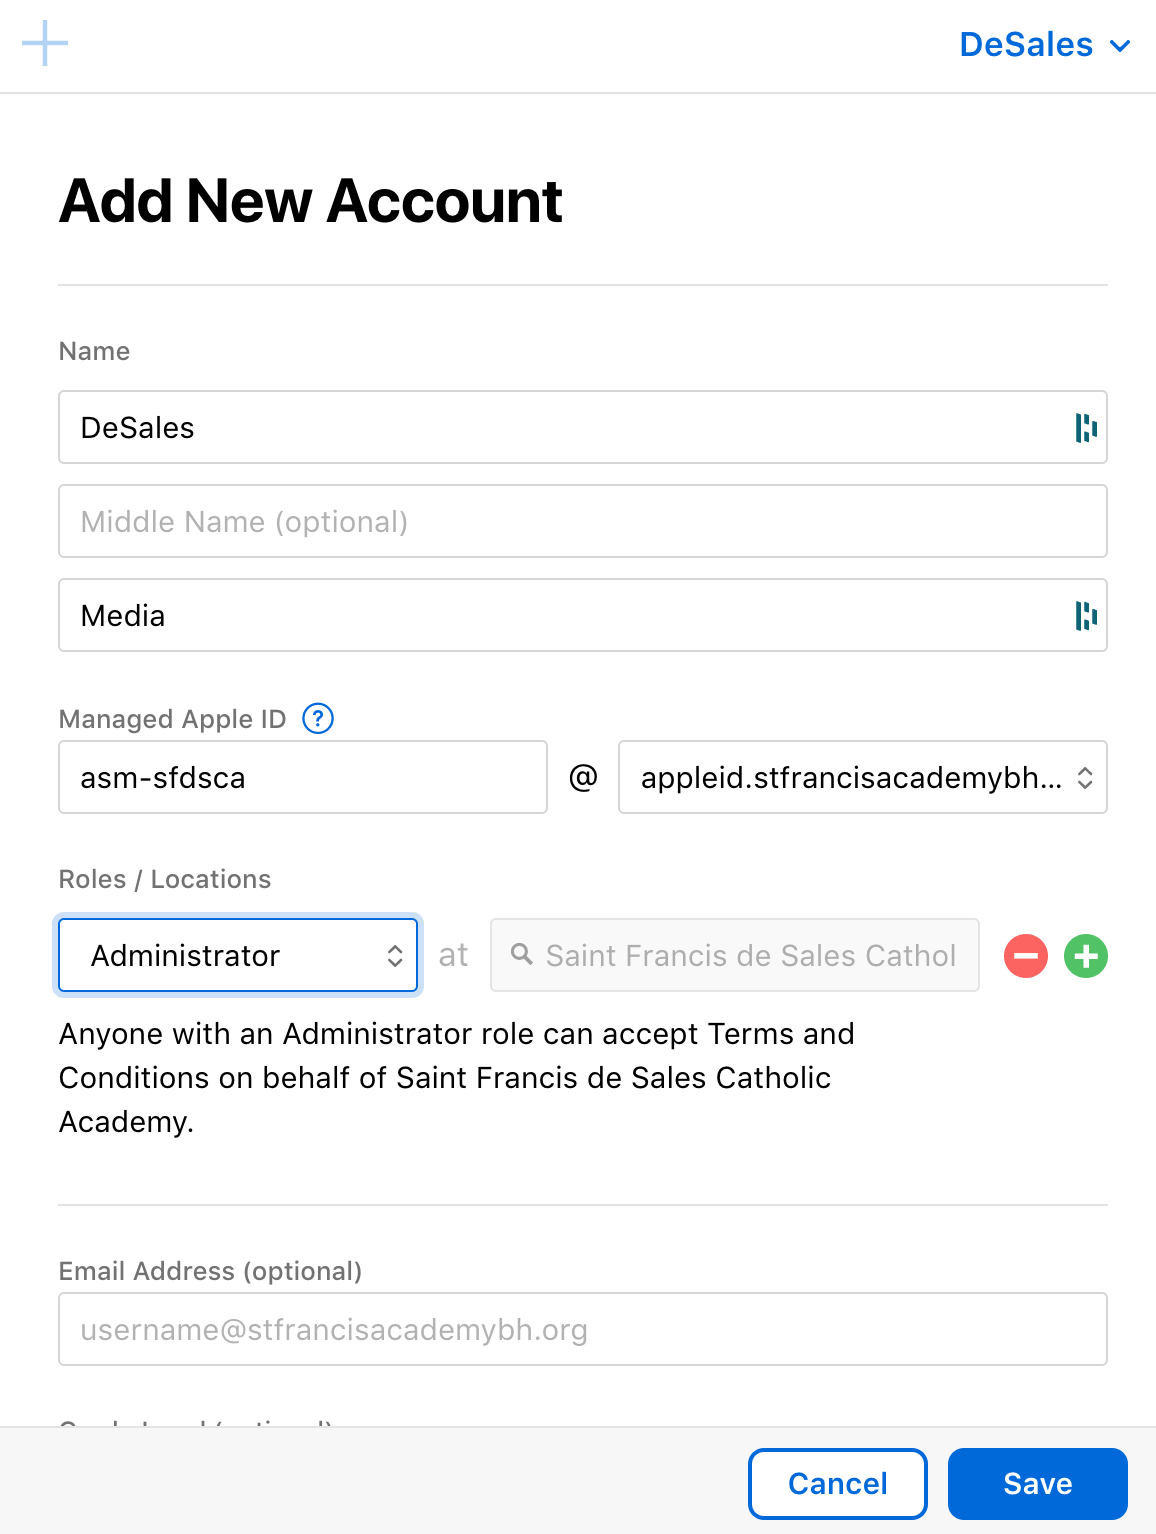
We need to create an account in @desalesmedia.org for you to use; please send an email to ipads@desalesmedia.org and let us know you would like to create an ASM account for us and we will respond with the details. Once you have it, you can follow these steps:
- Login to Apple School Manager.
- Click Accounts
- Click the Add New Account button (plus-sign icon at the top)
- First Name: DeSales
- Last Name: Media
- Managed Apple ID: asm-XXXX and in the box to the right, select appleid.yourdomain.org (replace the XXXX with the info we email to you)
- Role: Administrator
- Email Address: asm-XXXX@desalesmedia.org (we will email you with the address)
- Click Save
- Click on the new account that was just created and then click "Create Sign-In" (on the right side under the name) and choose Email.
What is my school's Apple Customer Number?
This is a six or seven digit number assigned by Apple. Even if your school doesn't have an Apple School Manager account, you probably do have
an Apple Customer Number. Send an email to ipads@desalesmedia.org and we can probably look it up for you.
I forgot my password to login to Apple School Manager.
Anyone else at your school who has a login to Apple School Manager can reset your account (as long as they have admin privileges). Your
principal probably has an account.
For security reasons, Apple makes it very difficult for you to reset this password. You can expect it to take at least a week.
If no one at your school is able to login, call Apple Deployment Programs Support at 866-902-7144. They should at least be able to
point you in the right direction. If they are unable to resolve it, ask them for a case number and email that case number to
ipads@desalesmedia.org and copy ctn@desalesmedia.org and your principal and we will contact Apple to begin the process to reset the
password on your account.
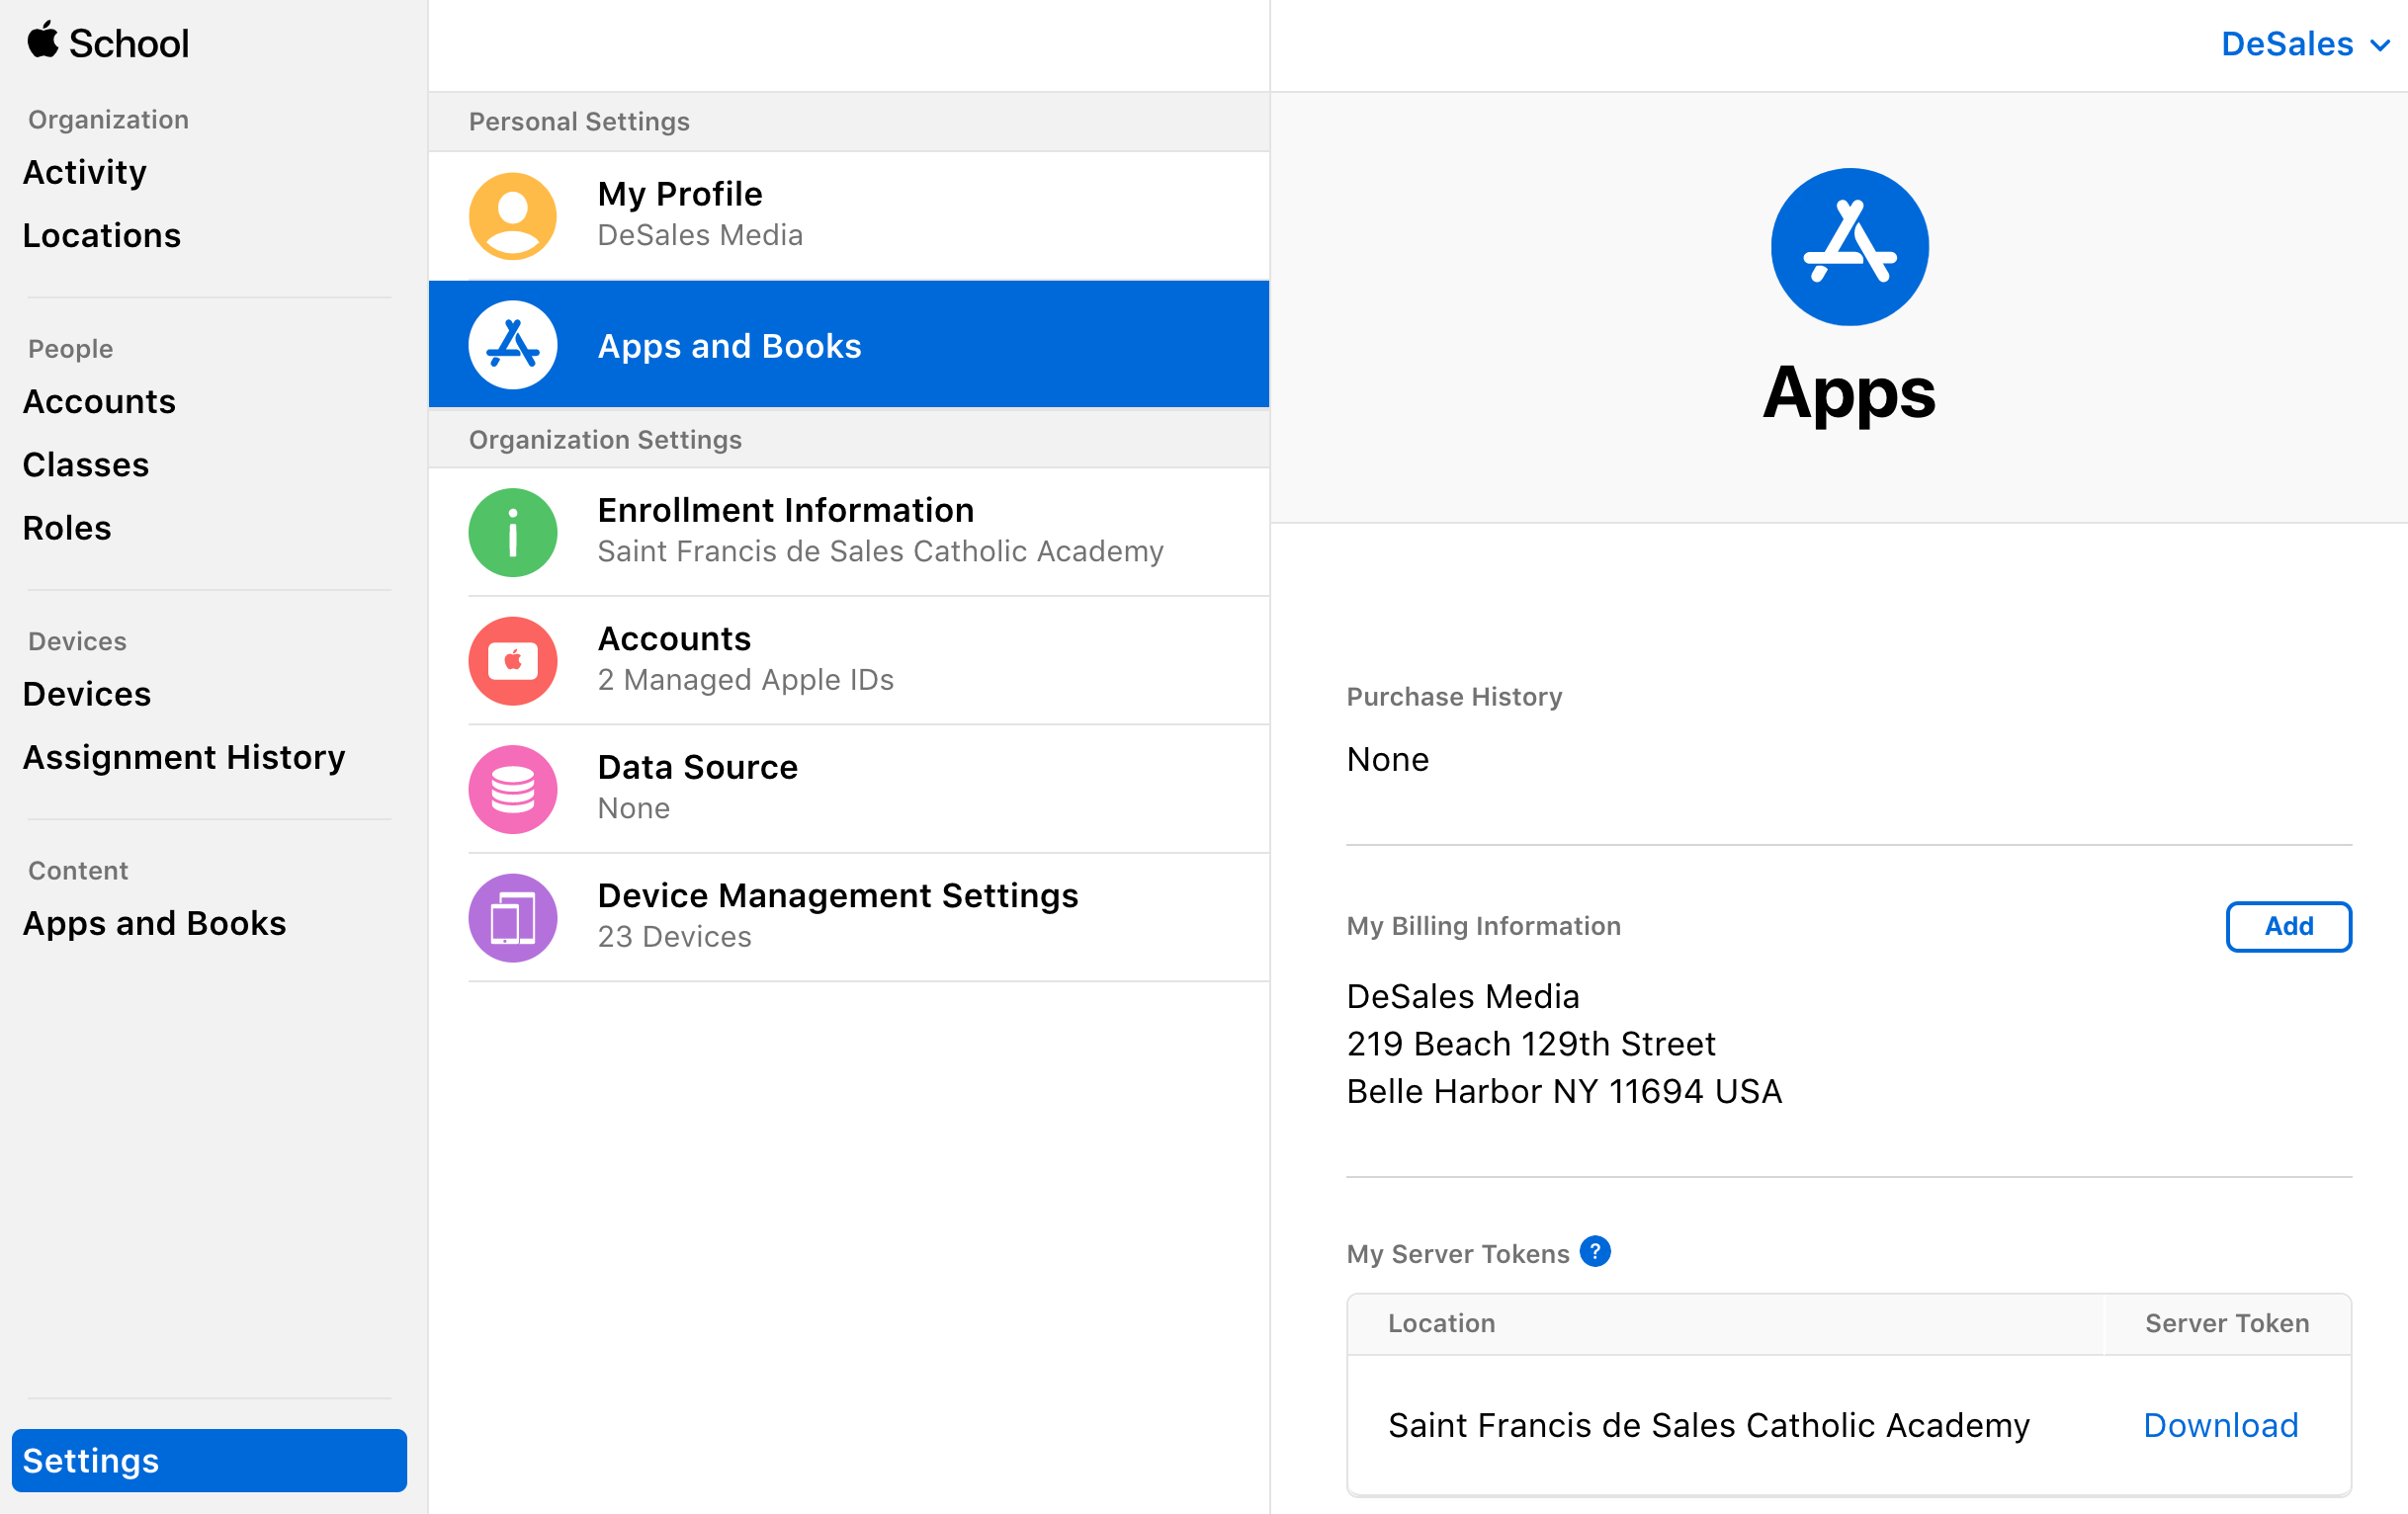
How do I purchase or download apps from Apple School Manager?
First, make sure you can login to Apple School Manager and that you have imported the
VPP token into Workspace ONE. Click Apps and Books on the left navigation bar. If you do not see Apps and Books
in the list, your account probably does not have permissions to download apps. Ask your principal to grant your account the
necessary permissions.
Enter the app name in the Search box, and then click on the name of the app. Select a location, enter a quantity, and click Get.
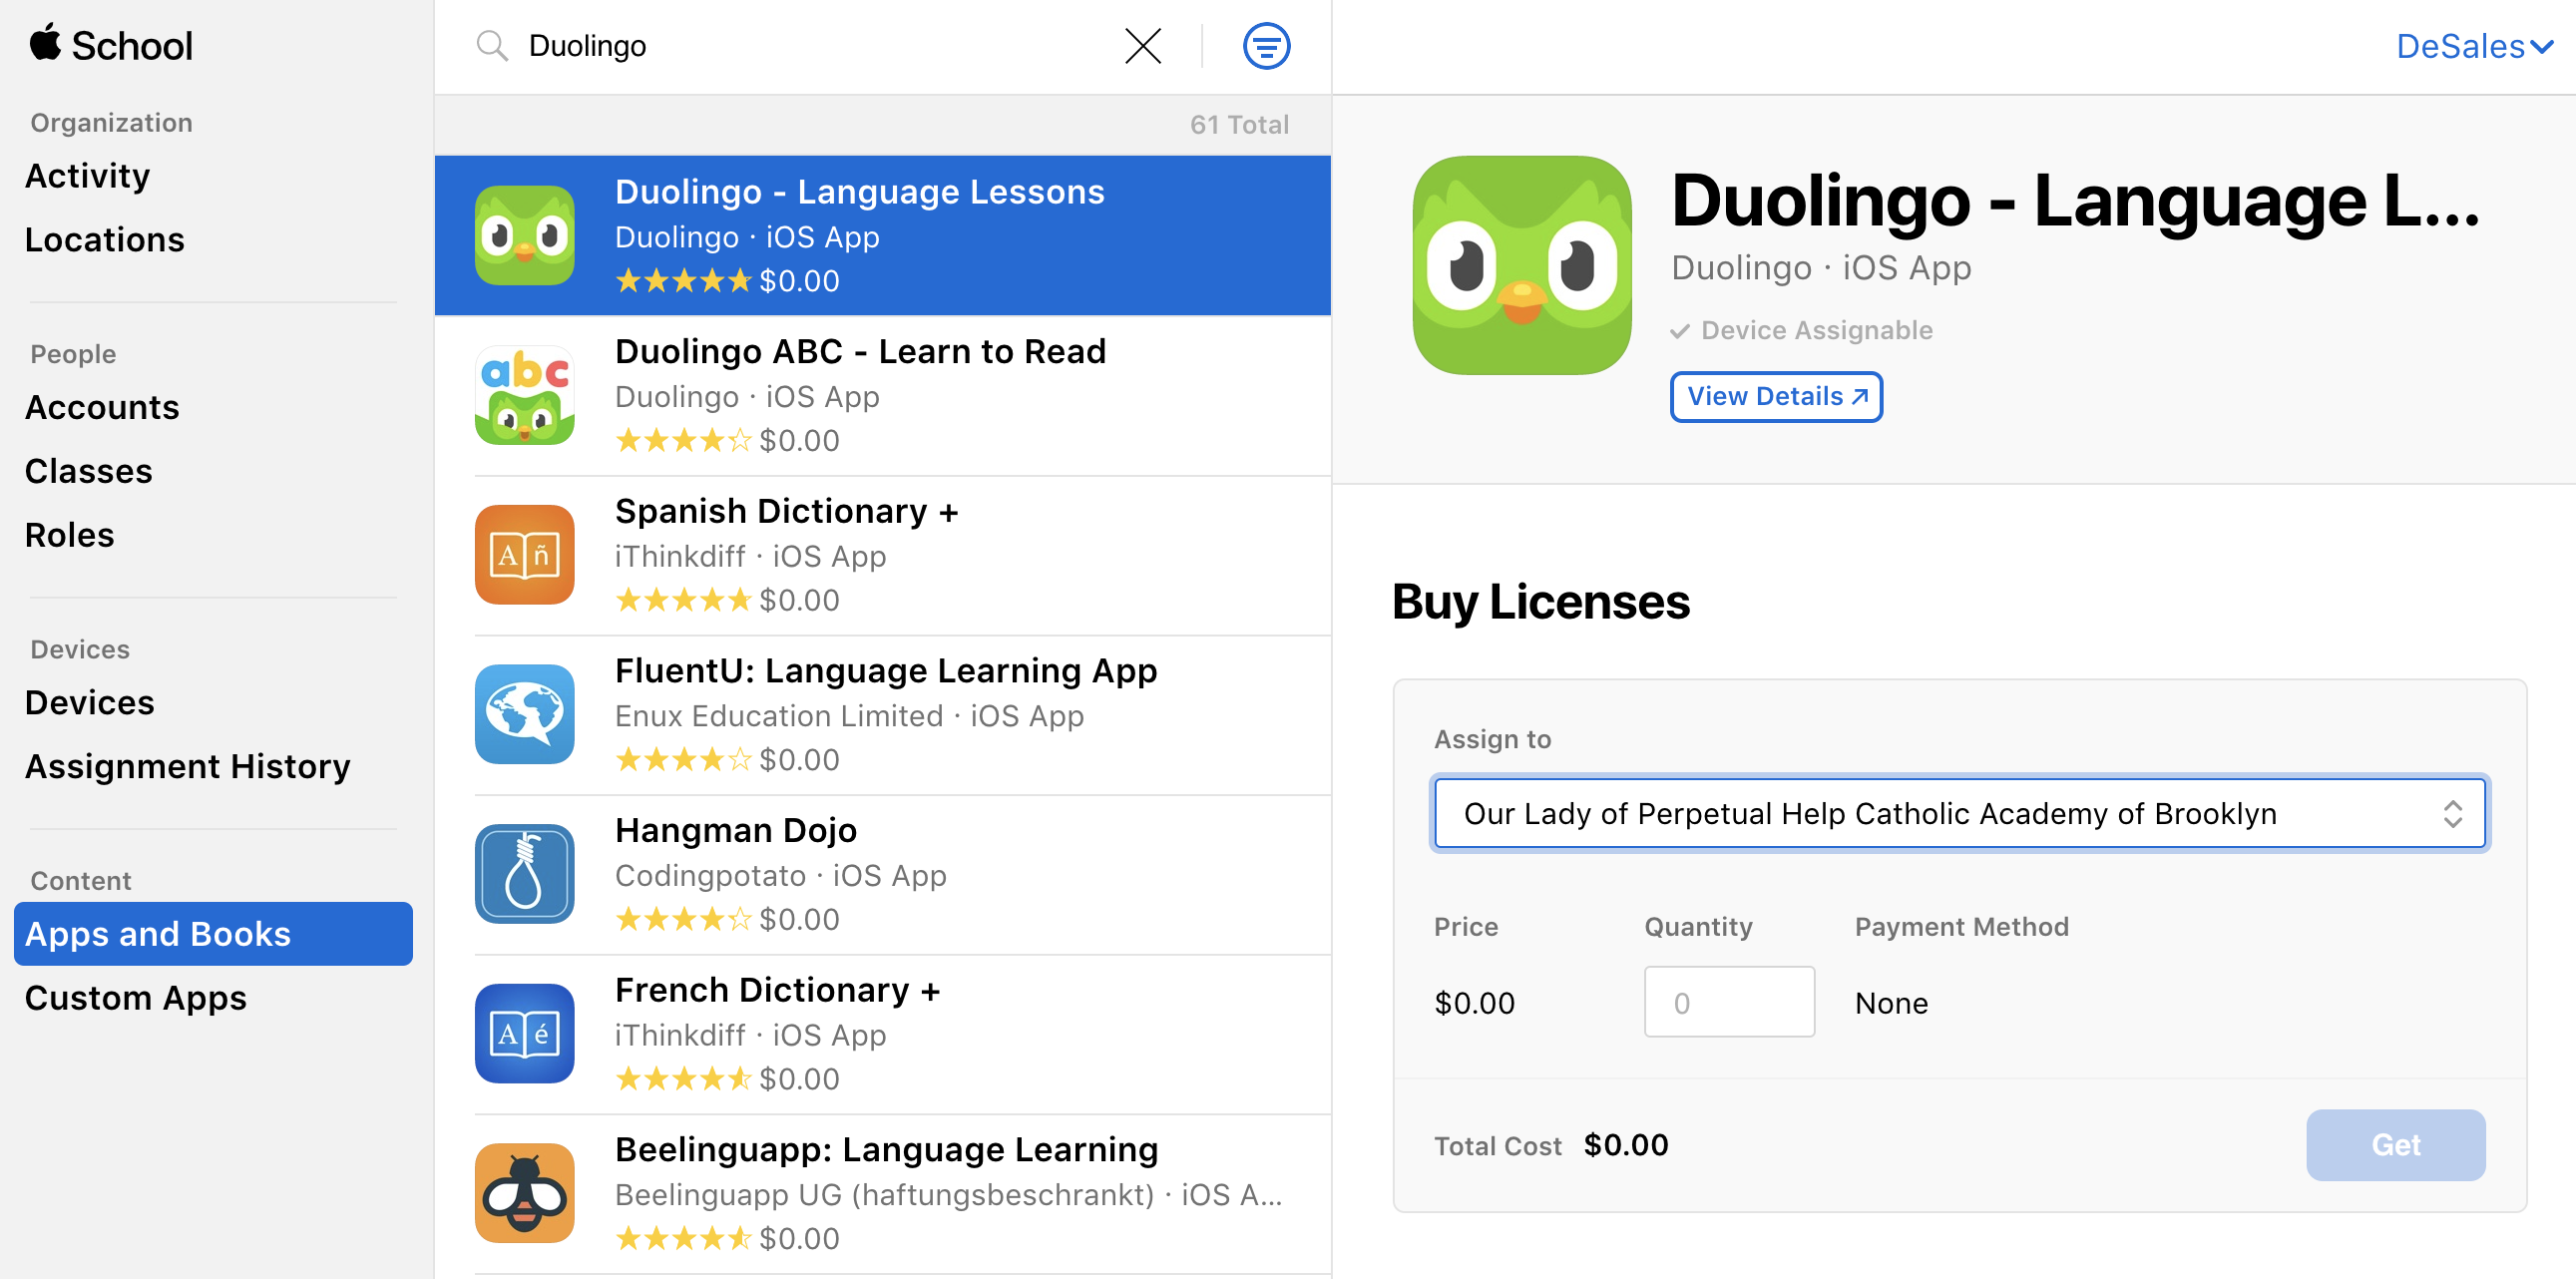
Apple School Manager will automatically synchronize your purchased apps with Workspace ONE about once every 24 hours. However, you can force this synchronization to happen immediately by logging into Workspace ONE, click on Apps and Books (in the navigation bar on the left), then click Applications, Native, Purchased, and then click Sync Assets.
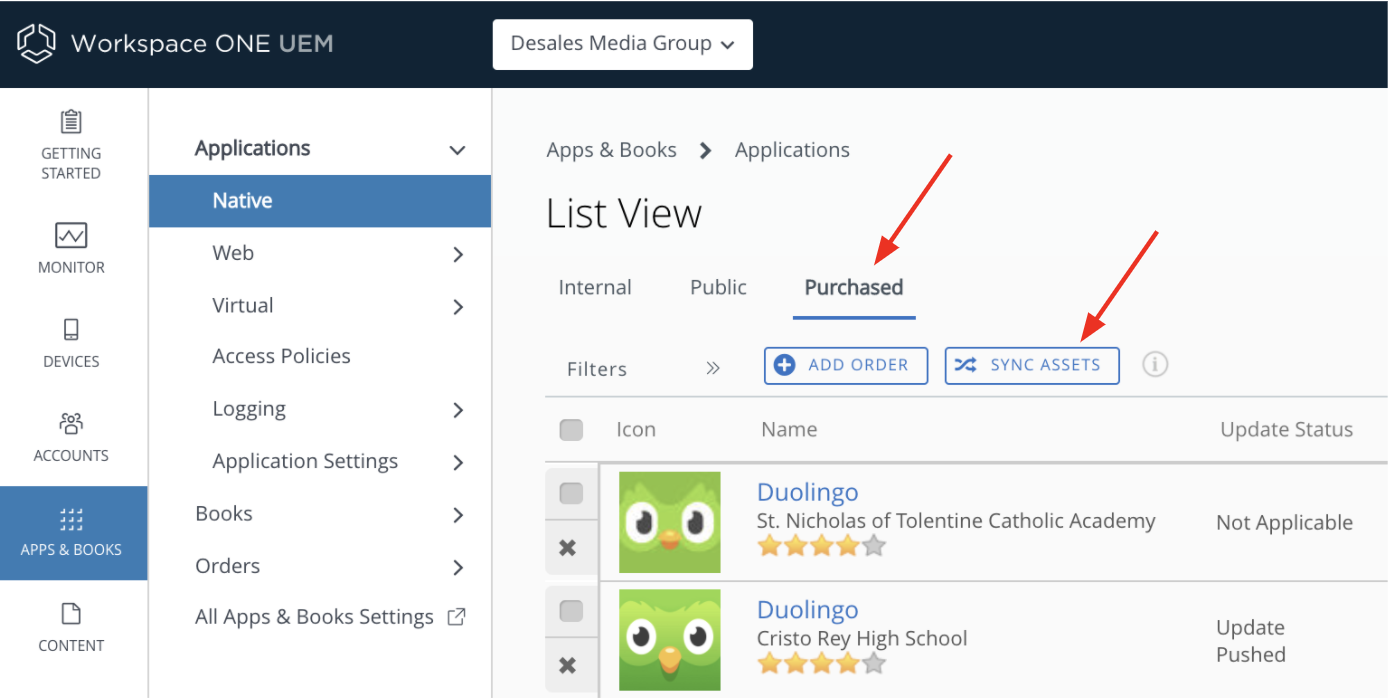
If you do not see your app listed, the most likely reason is that the VPP token is either not installed or has expired.
Enter the app name in the Search box, and then click on the name of the app. Select a location, enter a quantity, and click Get.
Apple School Manager will automatically synchronize your purchased apps with Workspace ONE about once every 24 hours. However, you can force this synchronization to happen immediately by logging into Workspace ONE, click on Apps and Books (in the navigation bar on the left), then click Applications, Native, Purchased, and then click Sync Assets.
If you do not see your app listed, the most likely reason is that the VPP token is either not installed or has expired.
I received an email from Apple with the subject line: Verify ownership of domain...
This is not optional. Follow
these instructions to add the required TXT record to the DNS configurations for your domain. If you do not know how to add these records,
please send an email to ipads@desalesmedia.org and we will be happy to help.
What is a VPP token and how is it used?
The VPP token is what links Apple School Manager (ASM) to Workspace ONE - any
apps you download in ASM will appear in Workspace ONE and can
be deployed to iPads. VPP tokens are good for one year and then they must be renewed. VPP stands for Volume Purchase Program.
Prior to November of 2019, VPP tokens were generated using iTunes, but since then they are managed with
Apple School Manager.
How do I install a VPP token for the first time?
- Export the server token from Apple School Manager (ASM):
- Login at https://school.apple.com
- Click Settings (lower left corner)
- Click Apps & Books (the first time you go there you will need to click Get Started, choose your Location, and click Agree to the Terms & Conditions; if you do not see Apps & Books, let me know)
- In the section called "My Server Tokens" click Download.
- Save the File. This is known as the "sToken"
- Import this token into Workspace ONE:
- Login at https://cn420.awmdm.com/AirWatch/Login
- Click Groups & Settings (lower left)
- Click All Settings, Devices & Users, Apple, VPP Managed Distribution
- Click in the radio button to select Override at the top of the page
- Enter a Description (it doesn't matter what you enter, but you cannot leave it blank)
- Click the Upload button to the right of the sToken field.
- Click Choose File, select the file, click Save, and Save (you may need to scroll down or make your window larger to see it)
- The date next to Valid Until should have changed to a later date (about one year from now)
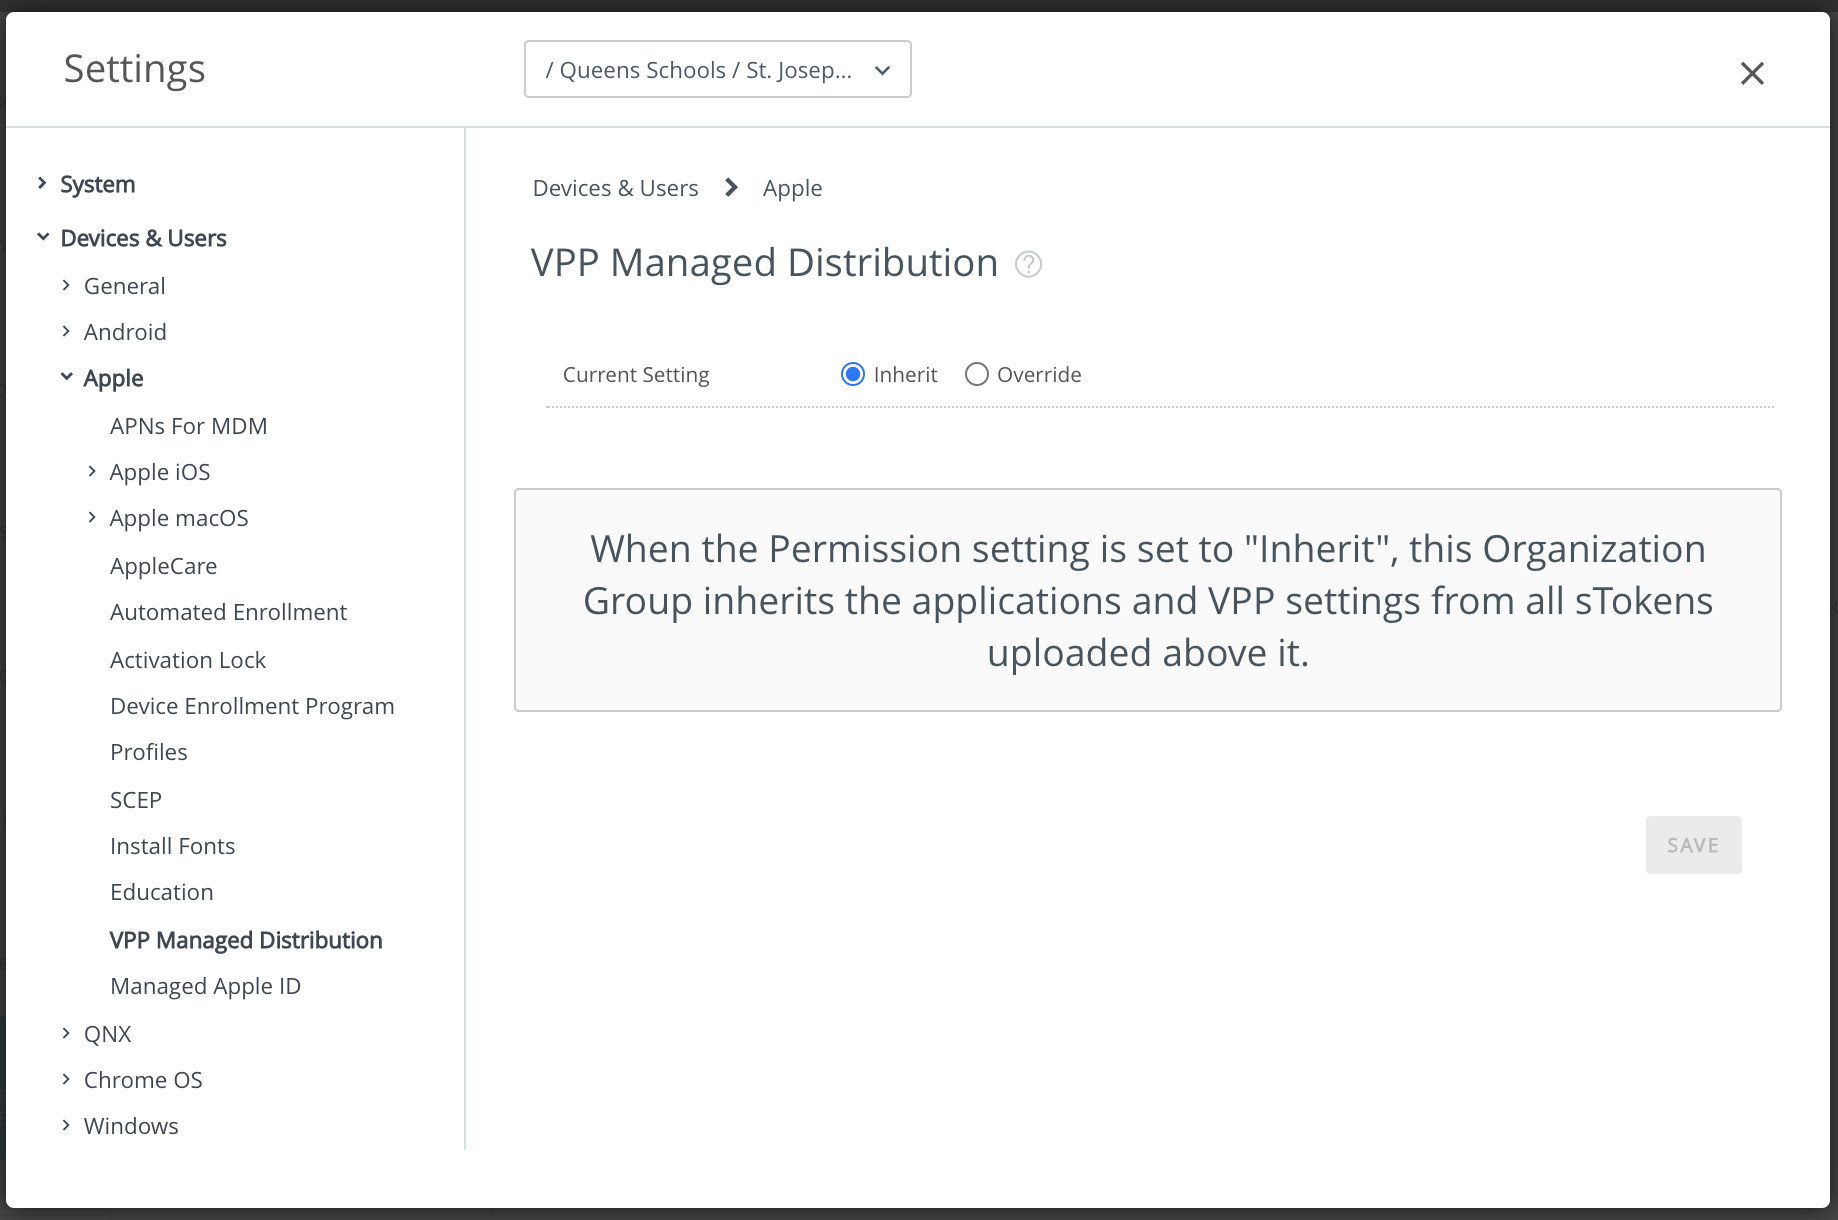
How do I renew my VPP token?
VPP tokens expire one year after they are issued. You do not need to wait until your token expires to renew it. Once you download
a token from Apple School Manager, it invalidates the previous token, so be sure
to import it into Workspace ONE right away. If your
VPP token expires, your apps will still function normally, but you will not be able to deploy new apps until you renew the token.
- Export the server token from Apple School Manager (ASM):
- Login at https://school.apple.com
- Click Settings (lower left corner)
- Click Apps & Books
- In the section called "My Server Tokens" click Download.
- Save the File. This is known as the "sToken"
- Import this token into Workspace ONE:
- Login at https://cn420.awmdm.com/AirWatch/Login
- Click Groups & Settings (lower left)
- Click All Settings, Devices & Users, Apple, VPP Managed Distribution
- Click the Renew button at the lower right corner of the screen (you may need to scroll down or make your window larger to see it)
- Select the file, click Save, and Save (you may need to scroll down or make your window larger to see it)
- The date next to Valid Until should have changed to a later date (about one year from now)
How do I deploy an app to all iPads at my school?
Click on the name of the app. The first time you click on an app, you will need to click the Enable Device Assignment button.
By default, apps are assigned based on the Apple ID of the user that is logged in. Because we do not allow students to login
with their Apple ID, the app will never install unless you change it to use Device Assignment. Once you click this button, you will
never see it again.
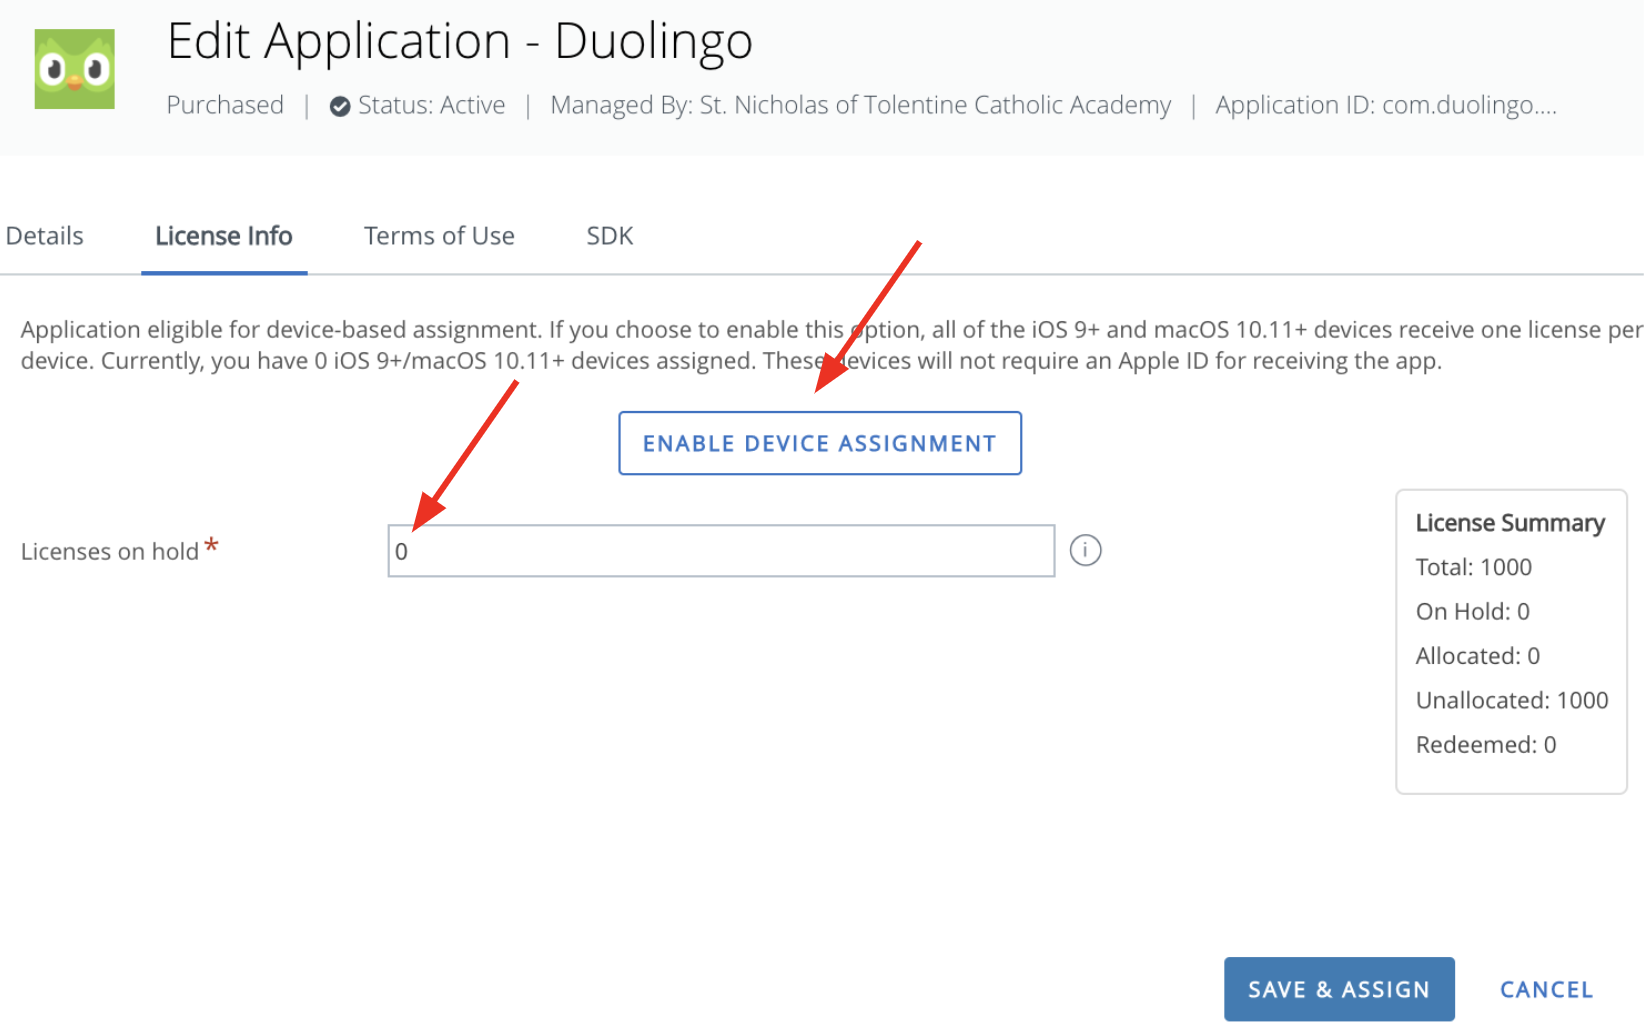
In the field for Licenses On Hold, leave the number as zero. The only reason why you would ever want to hold licenses would be if you did not want to deploy them. Click Save and Assign.
Enter the following info:
In the field for Licenses On Hold, leave the number as zero. The only reason why you would ever want to hold licenses would be if you did not want to deploy them. Click Save and Assign.
Enter the following info:
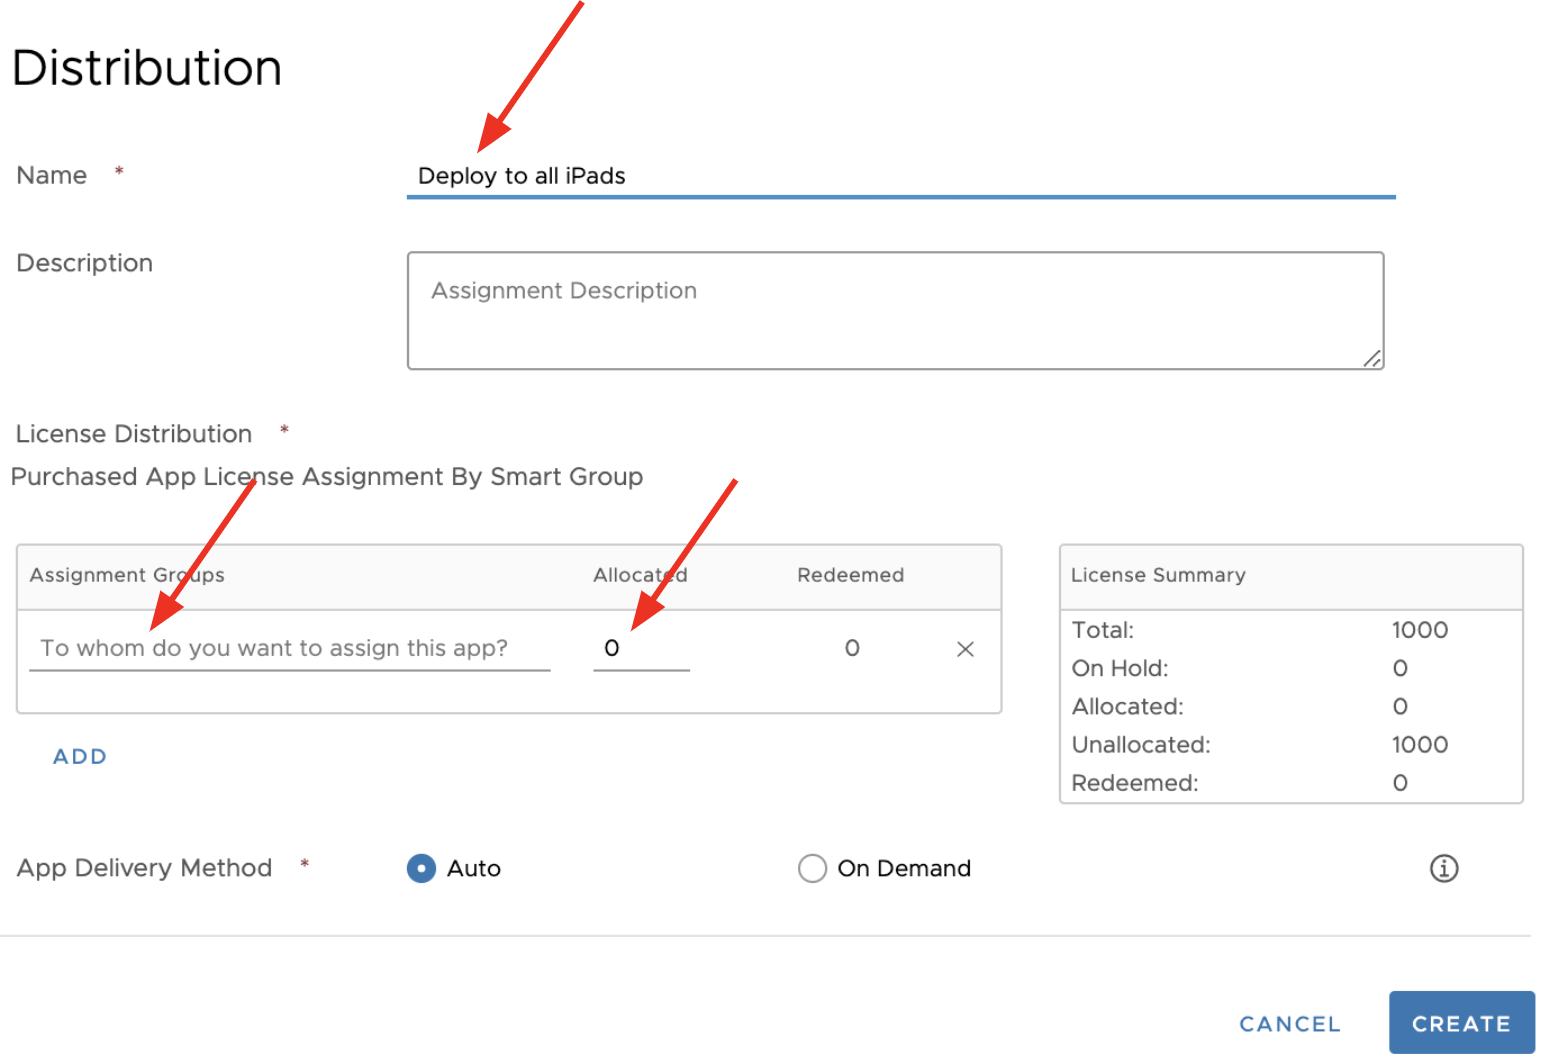
- In the Distribution window, enter a name. I recommend that you enter a note indicating if this app will be deployed to all iPads, only Student iPads, only Teacher iPads, or to a Smart Group.
- Click where it says To whom do you want to assign this app?. Select your school name (to deploy to all iPads), or select either Students, Teachers, or a Smart Group.
- In the Allocated field, enter a number that is less than or equal to the total number of licenses you purchased from Apple School Manager, and also is greater than or equal to the number of iPads to which you plan to deploy the app.
- Leave the radio button for Auto selected.
How do I deploy an app only to a subset of iPads at my school?
The best way to do this is to create a Smart Group for each app. Here are the steps.
- Create a Smart Group
- In Workspace ONE, click Groups and Settings (in the menu on the left), choose Groups, and then choose Assignment Groups
- Click Add Smart Group (at the top)
- We recommend you include your school's four or five character abbreviation and also the name of the app. For example: GSCA - Duolingo
- Click Devices or Users and then click OK at the warning box that pops up.
- In the Devices box, enter the names of an iPad and click Add (unfortunately, there is no easy way to add multiple iPads).
- Click Save
- Deploy the app to the Smart Group
- Click Apps & Books (in the menu on the left), choose Applications, Native, and then click Purchased
- Click the name of the app. If this was the first time you are deploying the app, you will need to click the Enable Device Assignment button.
- Leave a zero in the field for Licenses on Hold, and then click Save & Assign.
- If you have previously assigned this app to other assignment groups, you will see the Assignment window and you can click on the Assignment Name. If you have never assigned this app to any other assignment groups, you will see the Distribution window where you can enter a name. We recommend you enter the name of the Smart Group as the Assignment name.
- Click where it says To whom do you want to assign this app? and select the Smart Group you just created
- In the Allocated field, enter a number that is less than or equal to the total number of licenses you purchased from Apple School Manager, and also is greater than or equal to the number of iPads to which you plan to deploy the app.
- Leave the radio button for Auto selected.
- Then click Create. Then click Save. Then click Publish.
I deployed an app, but I don't see it on an iPad.
This is a common problem and one that some people spend a lot of time troubleshooting. There is not one answer - you need to keep trying
things until you find a resolution. What worked at one school might not work at another; what worked on one iPad might not work on another.
In general, the fewer apps you have deployed, the fewer problems you will have with apps not installing. DeSales installs about a dozen apps on most iPads and you cannot remove those. If you have 5-10 apps deployed at your school (in addition to the apps deployed by DeSales), you will probably not have too many problems. If you have 10-15 apps, you will probably have occasional problems. If you deploy more than 20 apps, you are likely to have frequent problems. If you have more than 10 apps deployed, we recommend you segment the iPads by grade level and use Smart Groups to deploy individual apps to each grade level - that way you don't have to put every app on every iPad.
When troubleshooting app deployments here are the first things to check:
- Make sure Workspace ONE is correctly configured to assign the app to the iPad. You can verify this in one of two ways:
- From the iPad, open the Catalog app and verify you see it listed
- In Workspace ONE, click Devices (in the menu on the left), click List View, click on the iPad name, click the Apps tab and verify it shows up in the list.
- Make sure the iPad can connect to Wi-Fi and can browse web pages (apps will often not install over cellular data). Open a web browser and search for "bandwidth speed test" and run a test; if you have less than 1Mbps of downloading bandwidth, the download might timeout. Try moving to an area that has a stronger Wi-Fi signal or try using the Internet at a different time of day when fewer other people are using it.
- Make sure the iPad has at least 1GB of free storage space
- Make sure the current version of iOS is supported by the app (you will need to check with the app vendor for that). As long as you are on version 13.1 or later, you are probably okay.
- Reboot the iPad by holding down the top button for five seconds.
Could you tell me if a certain app or feature is enabled or disabled on our iPads?
I could make an educated guess, but I couldn't say for sure. There is a hierarchy to the configuration in Workspace ONE and in most
cases, there are multiple profiles assigned at each level of the hierarchy. It is nearly impossible to tell for sure if a feature
or app is allowed or restricted only by looking at the configurations in Workspace ONE.
I recommend that you keep a student iPad for yourself so you can use it for testing. Because of the complexity of how the iPads are managed, unexpected outcomes can always occur. The only way to be sure something is blocked or restricted is to test it for yourself.
I recommend that you keep a student iPad for yourself so you can use it for testing. Because of the complexity of how the iPads are managed, unexpected outcomes can always occur. The only way to be sure something is blocked or restricted is to test it for yourself.
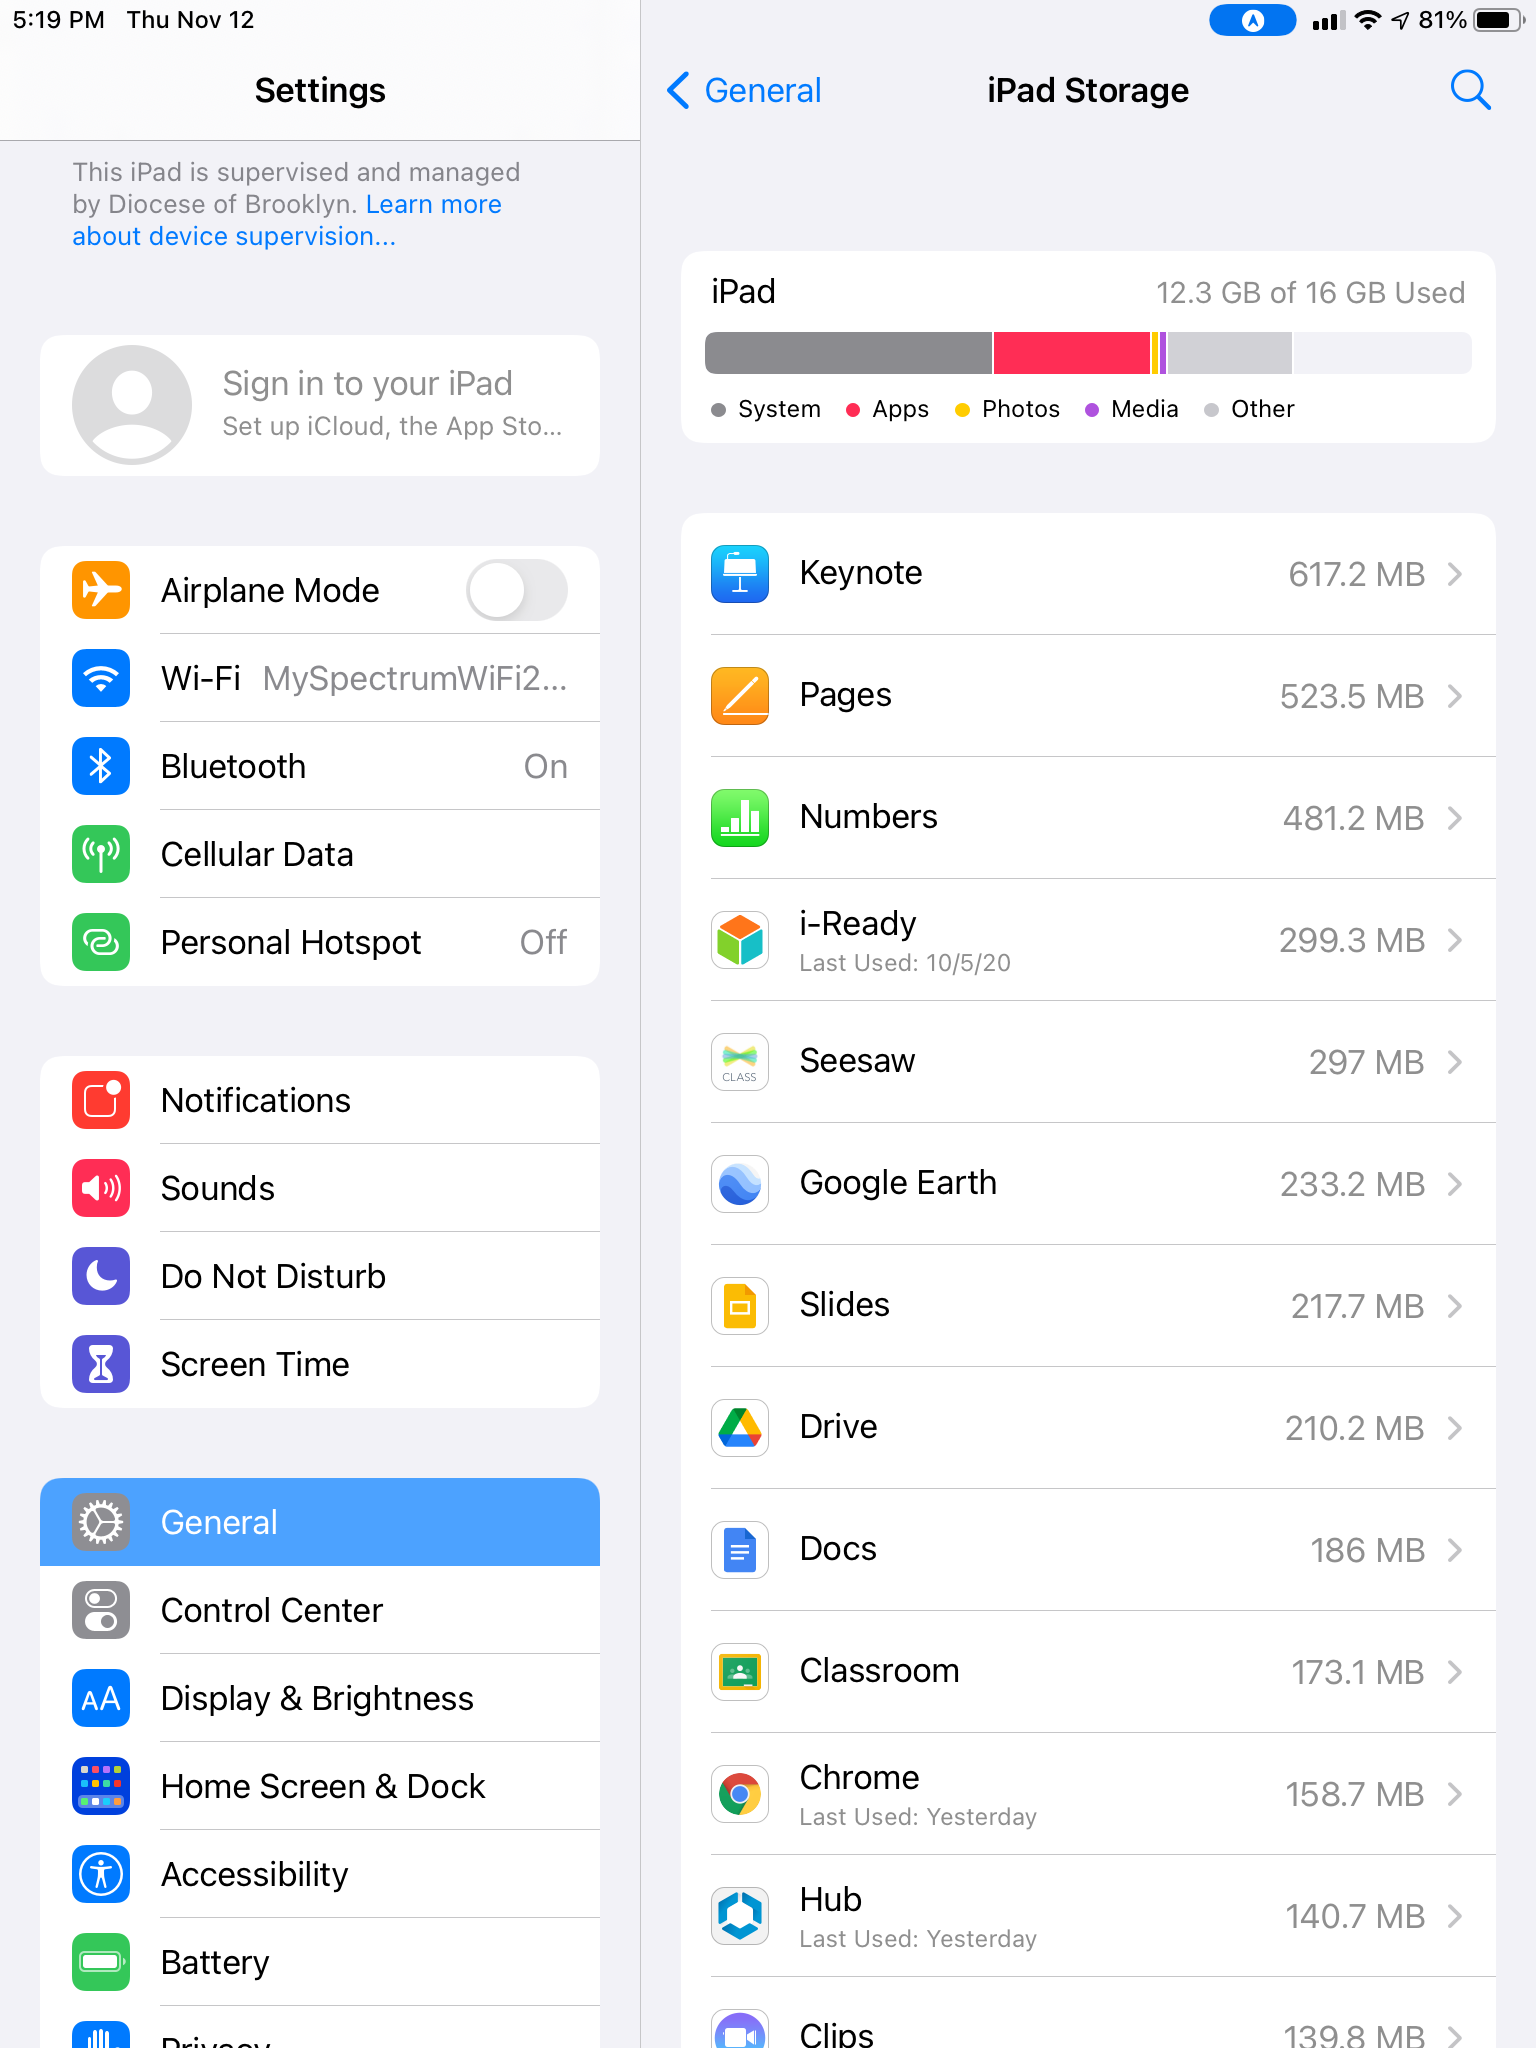
I'm having trouble installing or updating the i-Ready Connect app.
The app is configured to auto-deploy updates, but at certain times of the year (September especially), the updates servers get overloaded and it can be frustrating.
Here are some recommendations we have found to be helpful:
- Make sure you are at least on iOS 14
- Go to Settings > General > iPad Storage and verify that there is at least 500MB of space available (iPads with 16GB or 32GB will probably not be able to install it).
- Make sure you are connected to Wi-Fi. If it detects a cellular connection (or a slow Wi-Fi connection), it will not download the update.
- If you see the i-Ready icon on the Home Screen, tap it and choose Cancel Download. You may need to tap it two or three times before you see the option to Cancel Download. Then open the Catalog app and tap the Install button next to i-Ready Connect.
- Reboot the iPad. Sometimes that will kick-start the update process.
- Leave it powered on and connected to a charging cable over the weekend - or overnight. Some schools have seen the app pop-in the next day.
- Try connecting to a different Wi-Fi network.
Why are there two apps with similar names in the Workspace ONE list?
Sometimes app creators will change the name of their app (for example from "Seesaw Class" to "Seesaw: The Learning Journal"). The name in Workspace ONE will always reflect the name
of the app when it was first added to Workspace ONE. One way to confirm that "Seesaw Class" and "Seesaw: The Learning Journal" are the same app is to click on the app name, click Details
and then click "View in App Store". If you do that for both, you will see id930565184 in the URL path for both apps - thus they are the same app (just different names). This won't affect
the app's operation. It will automatically install the latest version of the app (regardless of the name change).
The screen cracked on one of my iPads? Can I get it replaced?
We handle these on a case-by-case basis. Please ask your principal to email ctn@desalesmedia.org with details about the request.
The case and/or power cable of one of the iPads is lost or broken. Can I get it replaced?
Unfortunately, DeSales Media does not replace cases, cables or power adapters. You can purchase replacements from Apple or other vendors.
Is this iPad covered by an AppleCare Warranty? If so, what type of issues can they help with?
New iPads come with one year of AppleCare warranty. You can check to see if your device is still covered by entering its serial number here:
https://checkcoverage.apple.com/us/en. Someone from the school or the parent could either
bring the iPad to an Apple Store or go to https://getsupport.apple.com/.
and get support via phone, email, or chat. If Apple determines that the iPad can be replaced under warranty, they will ask for a credit card to place a
temporary hold until the defective iPad is received back. Temporary holds are removed within 7 - 10 business days as long as there is no physical/liquid damage
to the device. If a credit card number cannot be provided, Apple will review in-store replacement options. They will guide the user over the phone on how to
schedule an appointment.
If Apple asks you to send the iPad to them, they will require that it be removed from our MDM (which stands for Mobile Device Manager which is a generic name for Workspace ONE). Please send an email to ipads@desalesmedia.org with the serial number and let us know you will be sending it to Apple and we will remove it. When Apple sends the returned/replaced iPad, please send an email to ipads@desalesmedia.org with the serial number so we can add it to Workspace ONE.
The following types of issues are typically NOT covered by AppleCare:
- Any physical damage (scratches, dents, broken glass, frayed cable, etc.)
- Something stuck in the headphone jack
- iPad will not charge and/or will not power on
- iPad display screen is distorted or has lines going across it making it unreadable
- iPad reboots unexpectedly
- Buttons not working
- Camera not working or all pictures are blurry
- Speaker or microphone not working
- Charging cable or headphones which do not have any visible damage
What headsets or other accessories do you recommend?
As long as it is supported on the iPad, you can use whatever accessories you like. We recommend you send an email to
desales-grant-device-management@googlegroups.com and describe what you are looking for and most likely others will respond with
information about what they have found to work well.
Can I pair a Bluetooth device to an iPad?
Yes. The Profile we deploy to teacher iPads allows pairing Bluetooth devices, but the profile for student iPads
does not. You can modify
either of these profiles. If you want only one student iPad to be able to pair with a Bluetooth device, you could temporarily modify the
Profile to remove the restriction, pair the device, and then reapply the restriction.
To modify a Profile, follow these steps:
To modify a Profile, follow these steps:
- In Workspace ONE, click Devices (in the menu on the left), then click Profiles & Resources, and then click Profiles.
- Find the profile you want to modify and click its name. It will most likely be named something like: XXXX - Student Profile - Restrictions (with the Xs being an abbreviation for your school)
- Click on Restrictions (in green) on the left.
- If you see a blue button in the lower right corner for Add Version, then click it. You will not always see that button.
- Scroll down about half-way down the list (or use Ctrl-F to search for "Bluetooth") to Allow Bluetooth Settings Modification. Check the box to allow it.
- Click Save and Publish. Then click Publish.
Should I update the version of iOS on my iPads? How do I do that?
As a general rule, it is a good idea to update the version of iOS on all of your iPads about once per year. We recommend that you
install the latest version which is available at that time. All apps and user data will be preserved after the update is complete.
To update the iOS from an iPad
To update the iOS from an iPad
- Make sure the iPad is connected via Wi-Fi, because the update will take a very long time to download over cellular
- Tap Settings, then General, then Software Update
- Tap either Download and Install or Install (whichever one you see).
- If you receive any type error message, you will probably need to physically connect the iPad to a laptop or desktop to perform a restore.
- Login and navigate to Devices (in the menu on the left), then click Device Updates, then click iOS (toward the middle of the window next to OEM Updates).
- You can choose any version, but we recommend you choose the latest version - click in the circle and then click Manage Assignments (at the top)
- Click New Assignment
- For Assignment Name, you can enter an abbreviation of your school name
- If you want to deploy it to all iPads at your school, just select your school's name from the Select Smart Group list. You could optionally create an Assignment Group containing a portion of your iPads.
- Click Next, enter a day and time, select Download and Install and click Next.
- You will have two notification options where you can choose if you want a notification message on the iPad indicating the download and/or install was successful.
- Click Save.
What can I do if I'm running out of storage space on one or more iPads?
That is a common issue on the 16GB iPads. If it is apps taking up the majority of storage space, you can often identify which subset
of apps are used by which subset of iPads and create Smart Groups for each app. But if it is "Other" data, then the only thing that
can be done is to Device Wipe and re-enroll the iPad.
Can we sell or give away some of the iPads we received from DeSales?
The iPads were given to your school as part of a grant, so you cannot sell them or give them away without permission from DeSales
Media. Please ask your principal to email ctn@desalesmedia.org with details about the request.
Can I (or a student or teacher) take an iPad to an Apple Store to ask for technical support?
Probably not. The person at the Apple Store will quickly be able to determine that the iPad is owned by and managed by the Diocese
of Brooklyn and so they will probably not want to help you.
I'm getting a message: Your SIM cannot be accessed. Please call your carrier to obtain your PUK code.
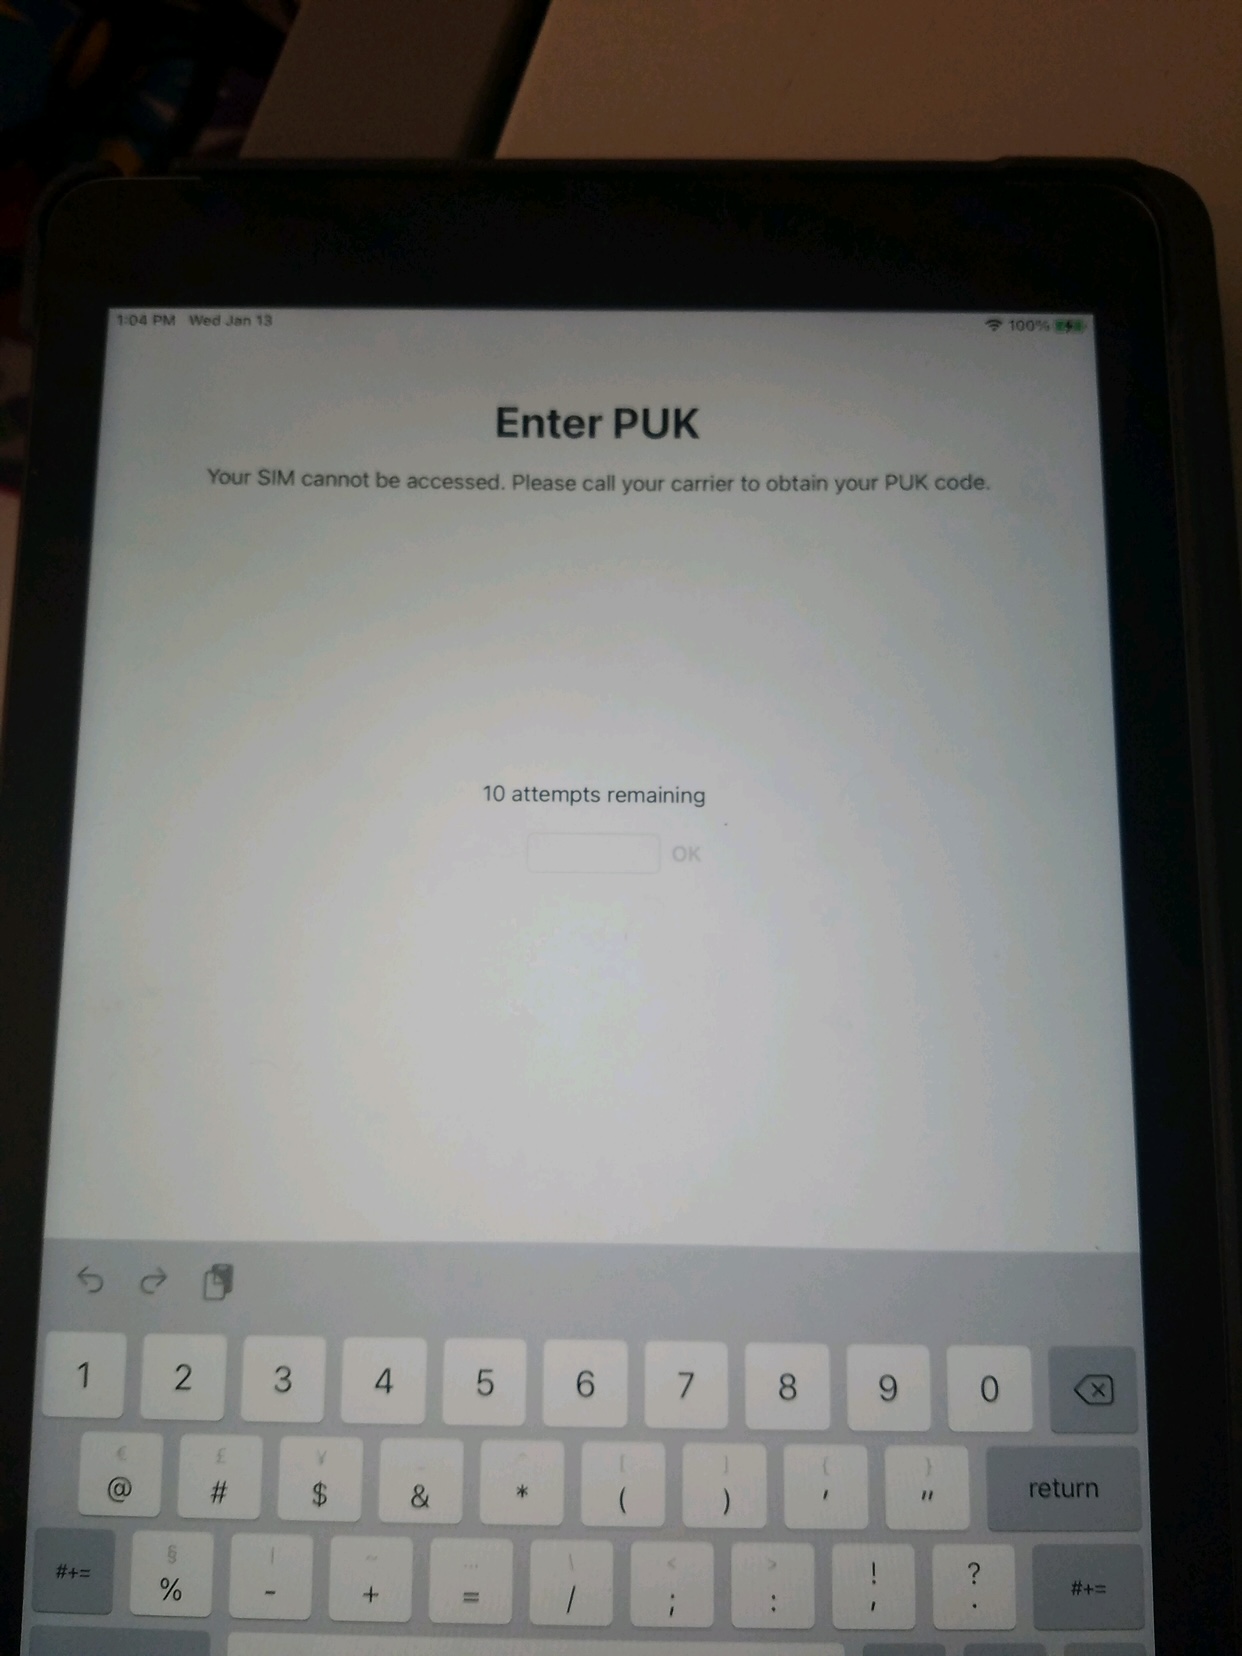
We are not sure what causes this message. Most likely, it is just a bug. Here are some steps you can take which will likely resolve it:
- Go into Settings > General > Reset > Reset Network Settings. This will not delete any apps or data and it will not need to be re-enrolled, but it will reboot the iPad.
- After it reboots, go into Settings > Cellular Data and tap "Manage Sprint Account". This should show the Sprint logo and then after about 45 seconds it should show an OK button. It might also give an error message such as "Unable to Activate Carrier Network" or "Connection Failed". If you get an error, you need to connect to a Wi-Fi network and go back into Cellular Data and tap "Manage Sprint Account" again. As long as you have Wi-Fi Internet access, you should not get the error message from Sprint.
I had a connector in the 3.5 mm headphone jack, but when I pulled it out, the connector broke off and is now stuck in the jack.
There are some things you can try, but it is entirely possible that this jack will never be usable again. Each of the steps below could potentially
render the jack unusable, but the first step is the least likely to do so.
- Take apart a ballpoint pen with a plastic ink cartridge. Use the back end of the plastic ink cartridge (without the pen tip) and stick that in the hole and try to catch it on the end of the metal plug and pull it out.
- If step 1 didn't work, use the same plastic ink cartridge, but hold the back tip over a flame for 1-2 seconds to soften the plastic (do not melt it) and try to stick it in the hole again while the plastic is still soft.
- If neither of the above steps work, try the superglue method: apply a very small dab of superglue to the end of the plastic pen ink cartridge, stick it in the hole, wait for it to dry, and pull it out. Just a warning: the vast majority of people who try this report that it does not work, but you might get lucky.
What is Lost Mode? How can I enable or disable it?
Enabling Lost Mode on an iPad will make it unusable until you disable it. When you enable Lost Mode, you enter a message and
phone number that will appear on the iPad and the user will not be able to access the home screen or any apps.
To enable Lost Mode, click on Devices (in the menu on the left), click List View, click the name of the iPad, click More Actions (in the far upper right), then scroll down and choose Lost Mode.
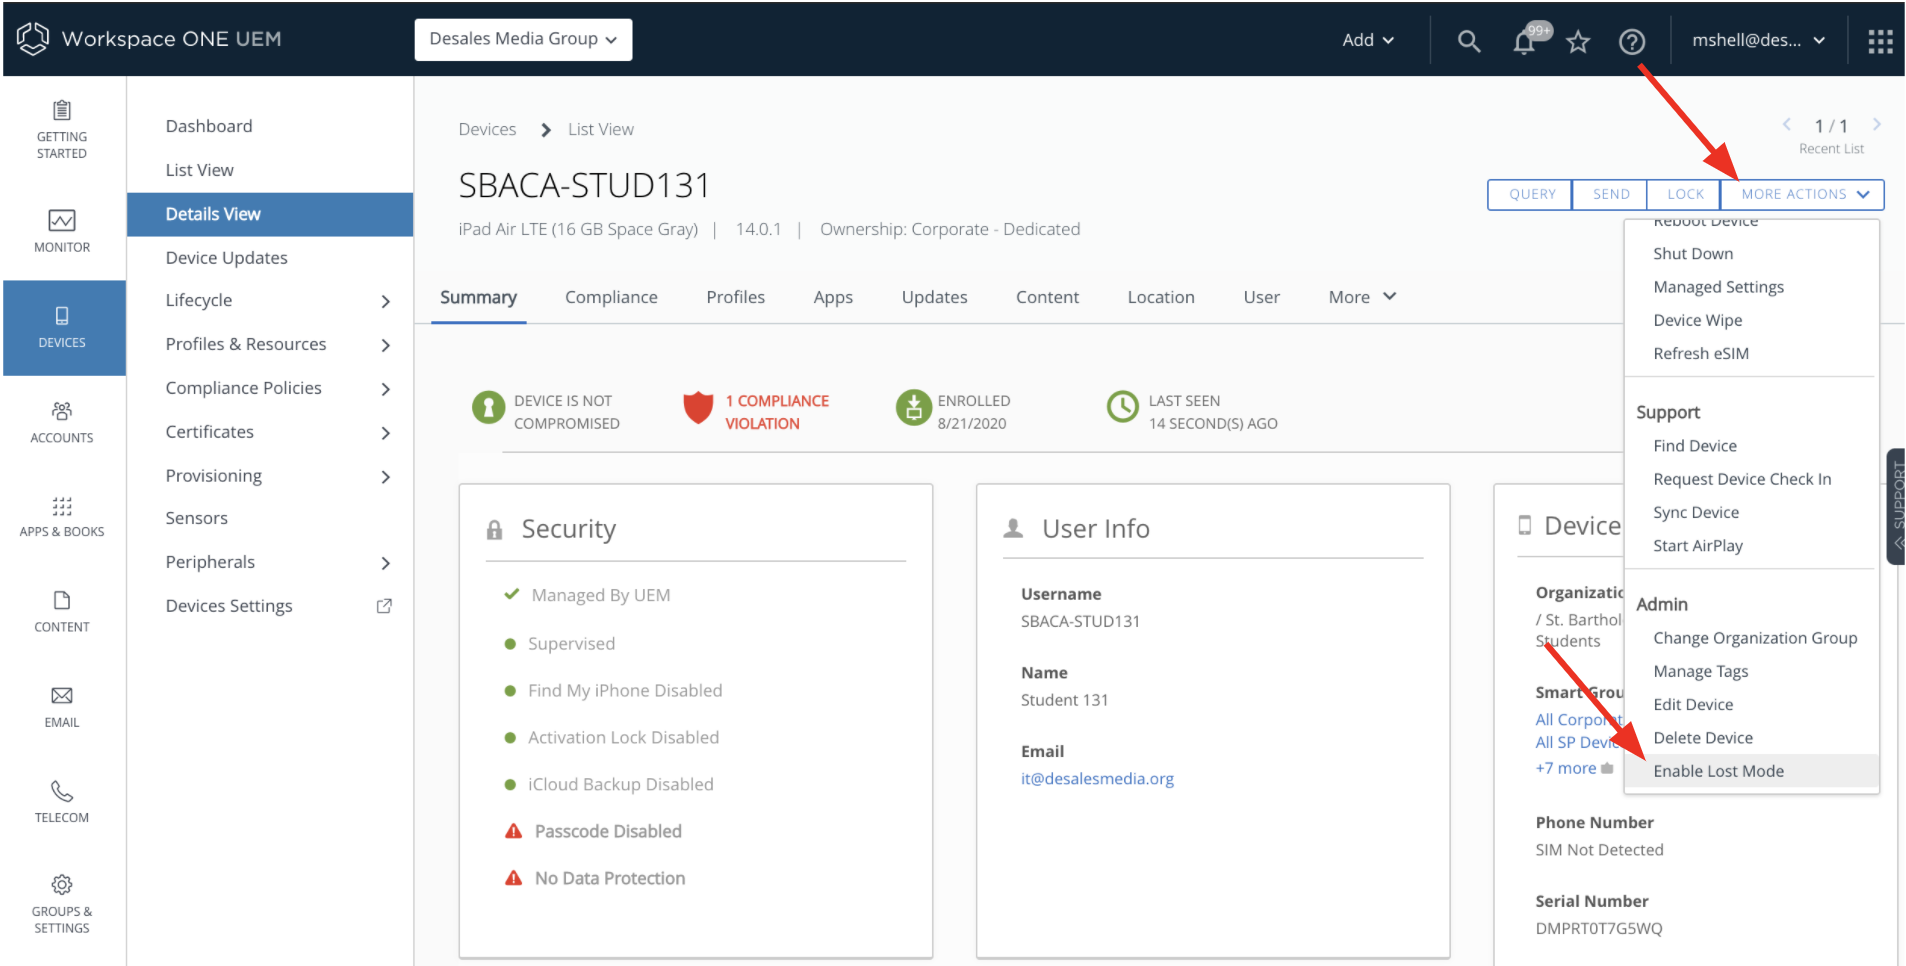
Here is a sample message you could use: This device is owned by the Diocese of Brooklyn. It is locked because it is believed to be lost. Please call us and reference device ID: SACA-STUD383 and we will unlock it. Thank you.
Be sure you notify the person who will answer the phone that someone may be calling regarding an iPad.
To enable Lost Mode, click on Devices (in the menu on the left), click List View, click the name of the iPad, click More Actions (in the far upper right), then scroll down and choose Lost Mode.
Here is a sample message you could use: This device is owned by the Diocese of Brooklyn. It is locked because it is believed to be lost. Please call us and reference device ID: SACA-STUD383 and we will unlock it. Thank you.
Be sure you notify the person who will answer the phone that someone may be calling regarding an iPad.
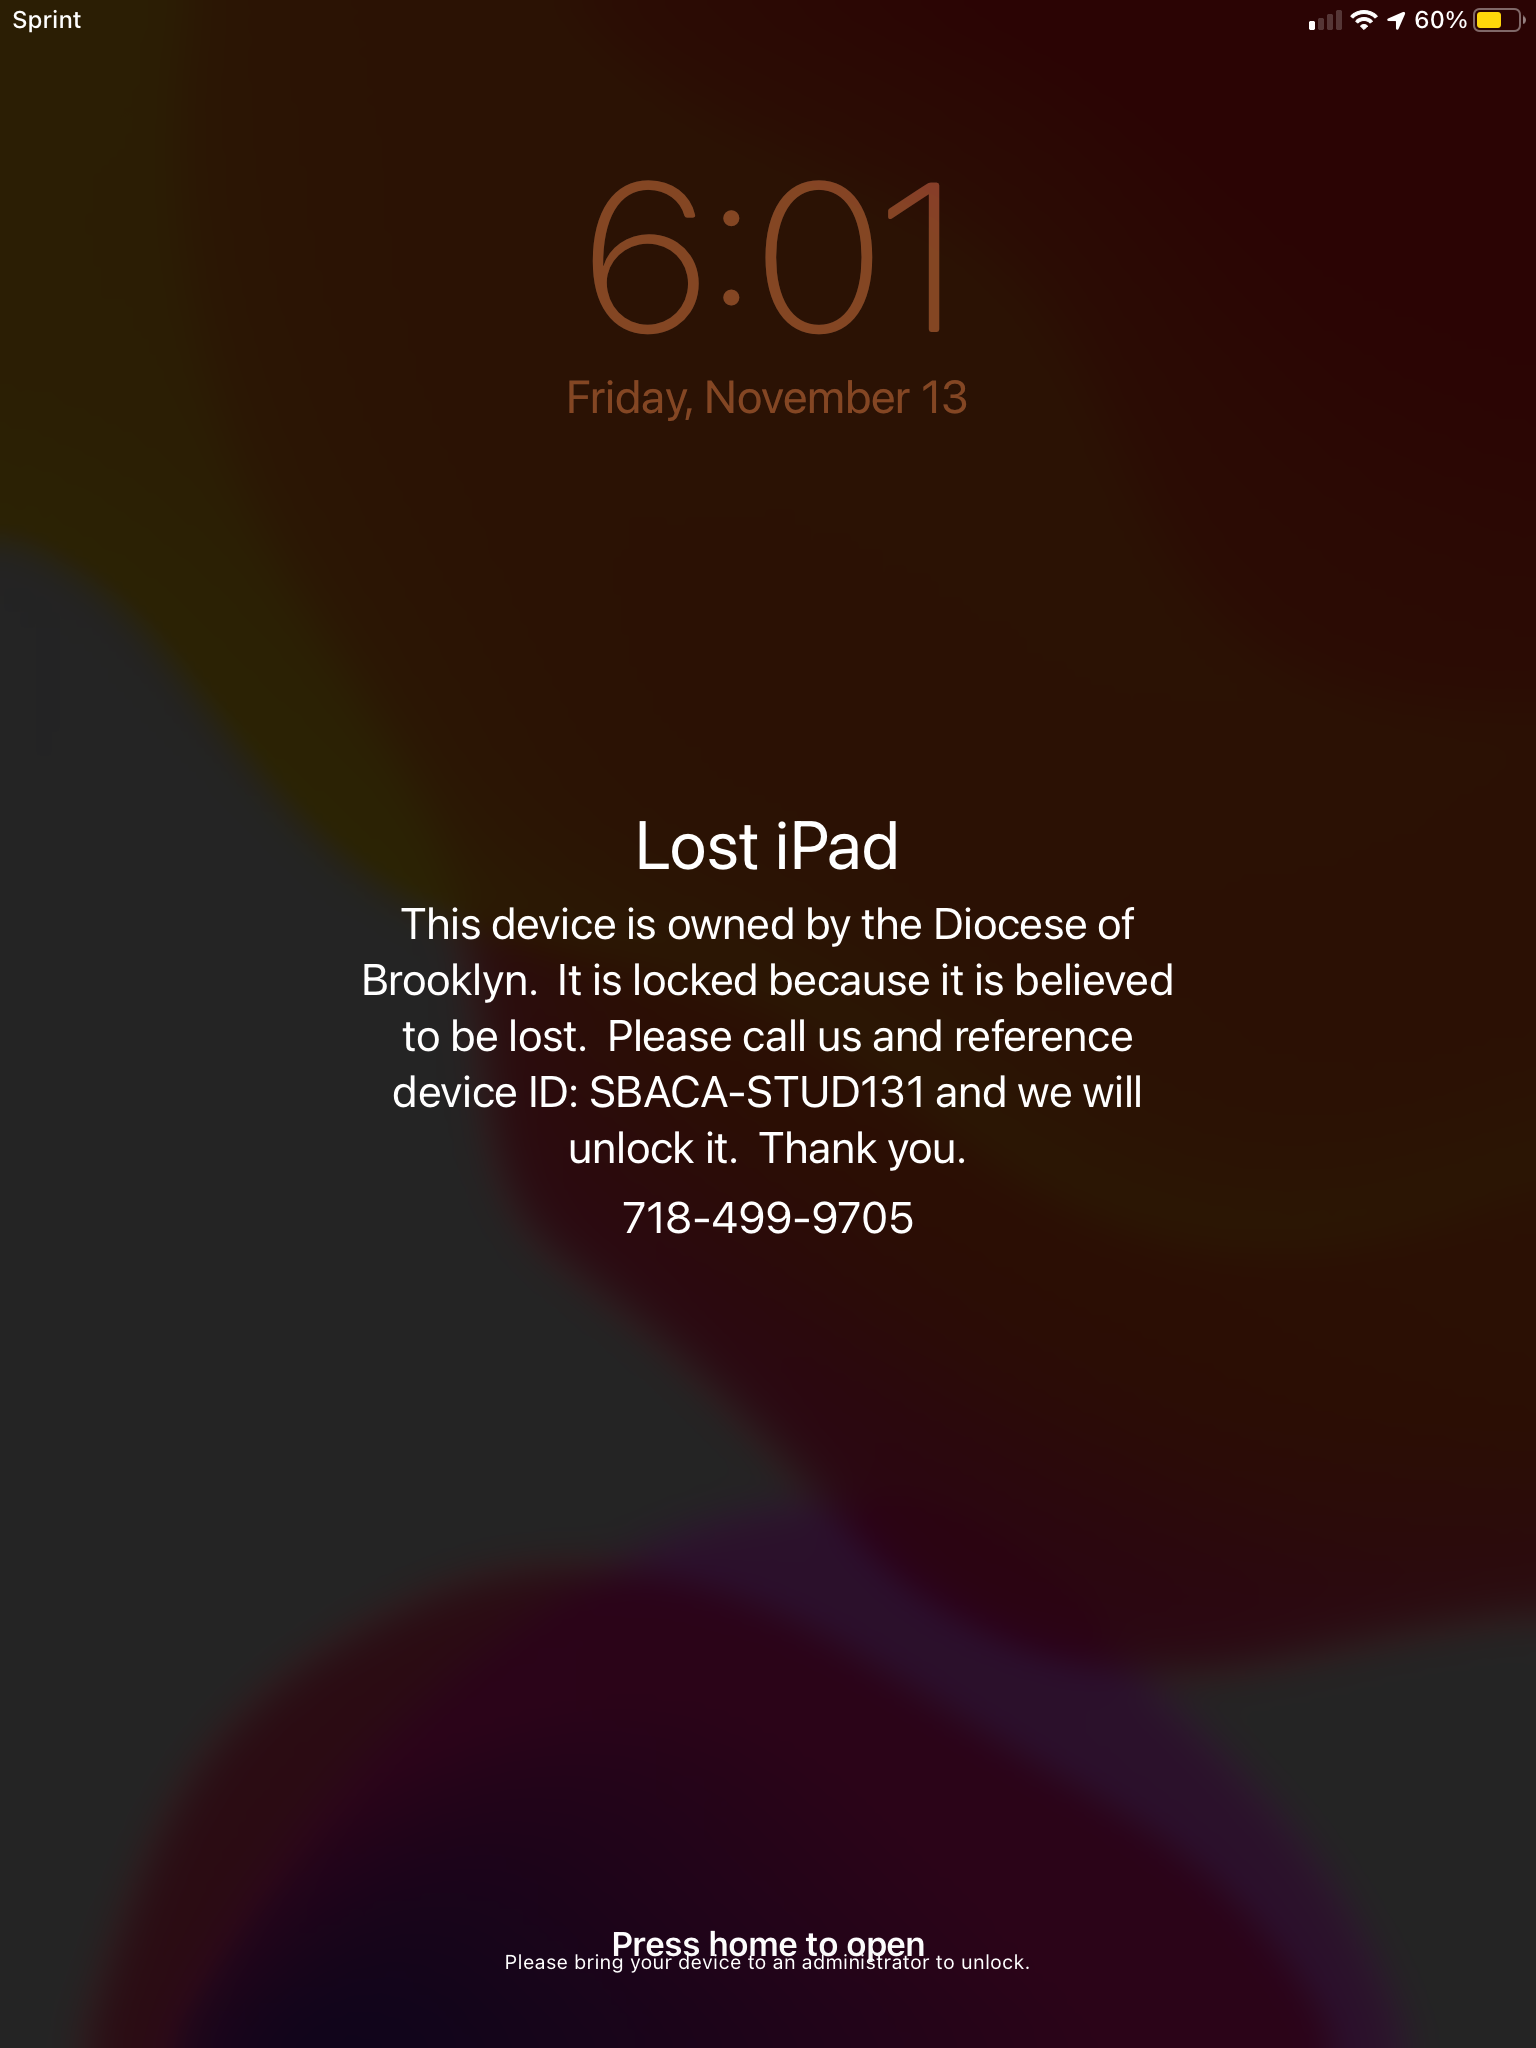
Can I view the GPS location of an iPad? Can I view the location for all of my iPads at once?
You can sometimes get GPS location information from an iPad in Workspace ONE, but you cannot view the location of more than one iPad
at a time. Also, it is not designed to be an accurate and reliable method of
tracking device locations, because some countries have privacy laws and restrictions which prohibit that.
We cannot even control when or how often the iPads will send their location information to Workspace ONE - it seems
to happen randomly. Typically an iPad will only update its location once every few days and for some reason, some iPads do not update their
location ever.
To view the most recent location, click on the iPad name in Workspace ONE and then click the Location tab.
You might be able to force an iPad to immediately update it's location information by temporarily putting it into Lost Mode. This doesn't always update the location information, but I have seen it work many times. This must be done individually for each iPad.
If I cannot find an iPad, but I think it is nearby, can I have it play a sound to help me locate it?
Yes, as long as the iPad is powered on and connected to the Internet. From Workspace ONE, click on Devices (in the menu on the left),
click List View, click the name of the iPad, click More Actions (in the far upper right), then scroll down and choose Find Device.
If you keep the default settings, it will make a sound like an old fashioned telephone ringing for about 15 seconds.
If you keep the default settings, it will make a sound like an old fashioned telephone ringing for about 15 seconds.
One of our iPads was lost or stolen. Could we get a replacement?
These situations are delt with on a case-by-case basis. Please send an email to ctn@desalesmedia.org and copy ipads@desalesmedia.org and
let us know the circumstances, when the iPad was last seen, and if you think there is a chance it could be recovered. If the iPad was
stolen, please send us a copy of the police report.
What is the difference between Device Wipe and Enterprise Wipe?
Device Wipe will factory reset the device, and when it reboots, you will need to go through the initial setup (choose English, U.S., etc.),
then connect to Wi-Fi, then it will automatically install the Hub app. Then you login to the Hub app using the
enrollment account and then it will automatically install all other apps. This is a very useful troubleshooting tool, because it
will resolve many issues with apps, the operating system, configurations, or other unexplainable problems. It takes about 20 minutes
to Device Wipe and re-enroll one iPad, but if you are doing multiple iPads simultaneously, you can probably do about 20 in an hour.
Please DO NOT EVER perform an Enterprise Wipe; this will remove all apps and policy restrictions which were deployed by Workspace NE and also remove the iPad from Workspace ONE. It will not delete any user data (pictures, movies, music, etc.) on the iPad. Because it is removed from Workspace ONE, we no longer have any control over it. You can often "bring it back into Workspace ONE", by going to the iPad, choosing Settings, General, Reset, and choosing "Reset All Content and Settings". If that doesn't work, you will need to ship the iPad back to DeSales so we can troubleshoot it.
Please DO NOT EVER perform an Enterprise Wipe; this will remove all apps and policy restrictions which were deployed by Workspace NE and also remove the iPad from Workspace ONE. It will not delete any user data (pictures, movies, music, etc.) on the iPad. Because it is removed from Workspace ONE, we no longer have any control over it. You can often "bring it back into Workspace ONE", by going to the iPad, choosing Settings, General, Reset, and choosing "Reset All Content and Settings". If that doesn't work, you will need to ship the iPad back to DeSales so we can troubleshoot it.
How can I perform a Device Wipe?
Make sure the iPad battery is at least 50% charged. Also, make sure you know the username which this iPad is enrolled with.
If you do not know the usernames it was previously enrolled with, you should identify an available username to be used
for enrollment.
- From Workspace ONE, click on Devices (in the menu on the left), click List View, click the name of the iPad (or enter the serial number in the search box), click More Actions (in the far upper right), then scroll down and choose Device Wipe.
- A window will pop up and although you might not see a scroll bar, you need to scroll to the bottom.
- Enter something in the Note Description box. It doesn't matter what you enter, but it cannot be blank. Click Continue.
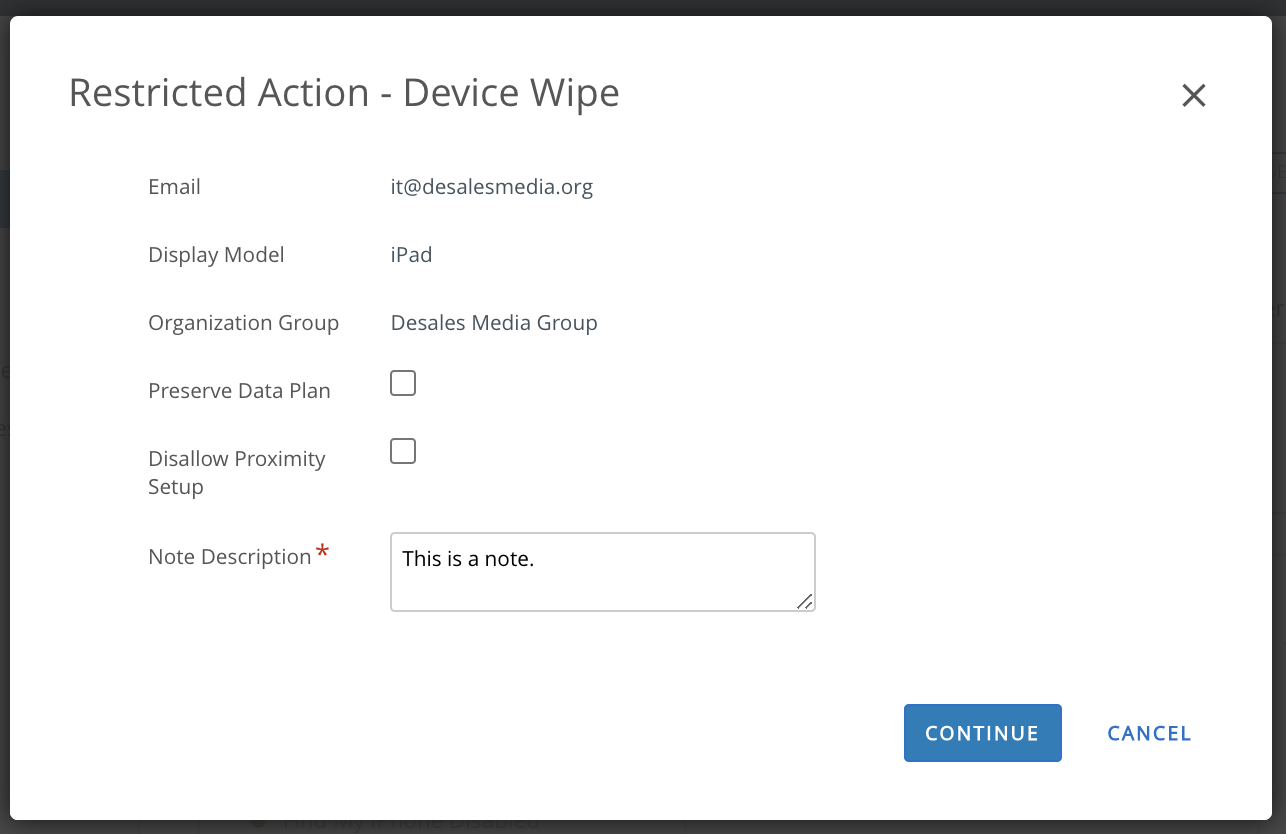
- Another window will pop up asking you to confirm your Security PIN. You would have set your PIN the first time you logged into Workspace ONE. If you do not know your PIN, you can email ipads@desalesmedia.org. If the iPad is powered on and connected to the Internet, it will begin to reboot within about 30 seconds.
- After about three minutes, when you see the Hello message on the iPad, press the Home button to get started.
- Select English as the language and United States as the Country. Then connect to a Wi-Fi network (if you use the cellular network the iPad might hang while installing apps and require you do Device Wipe again).
- Tap Continue or Next at the prompts. Choose Enable Location Services.
- When you get to the Home Screen, wait about 5 minutes for the Hub and other default apps to install.
- Open the hub app, tap I Understand (at the very bottom), then I Agree and login with the enrollment credentials (they are typically all CAPS).
- You may receive prompts asking you if you want to allow the Hub app to track your location; choose Allow or Always Allow.
- It will take between 10 and 30 minutes to finish installing all of the remaining apps. You can open the Catalog app to check the progress.
How can I perform a Device Wipe on an iPad which cannot access the Internet?
This procedure will take you about 30 minutes and you can only do one iPad at a time, so be sure you exhaust all other troubleshooting
options before beginning. You will need to connect the iPad to a laptop or desktop running the Mac or Windows operating system via a
USB cable. If the computer is a Mac running macOS 10.15 or later, then you will use Finder to perform the restore; if it is an older
version of macOS or it is using Windows, then you will use iTunes. If using iTunes, open iTunes and update it to the latest version
before connecting the iPad.
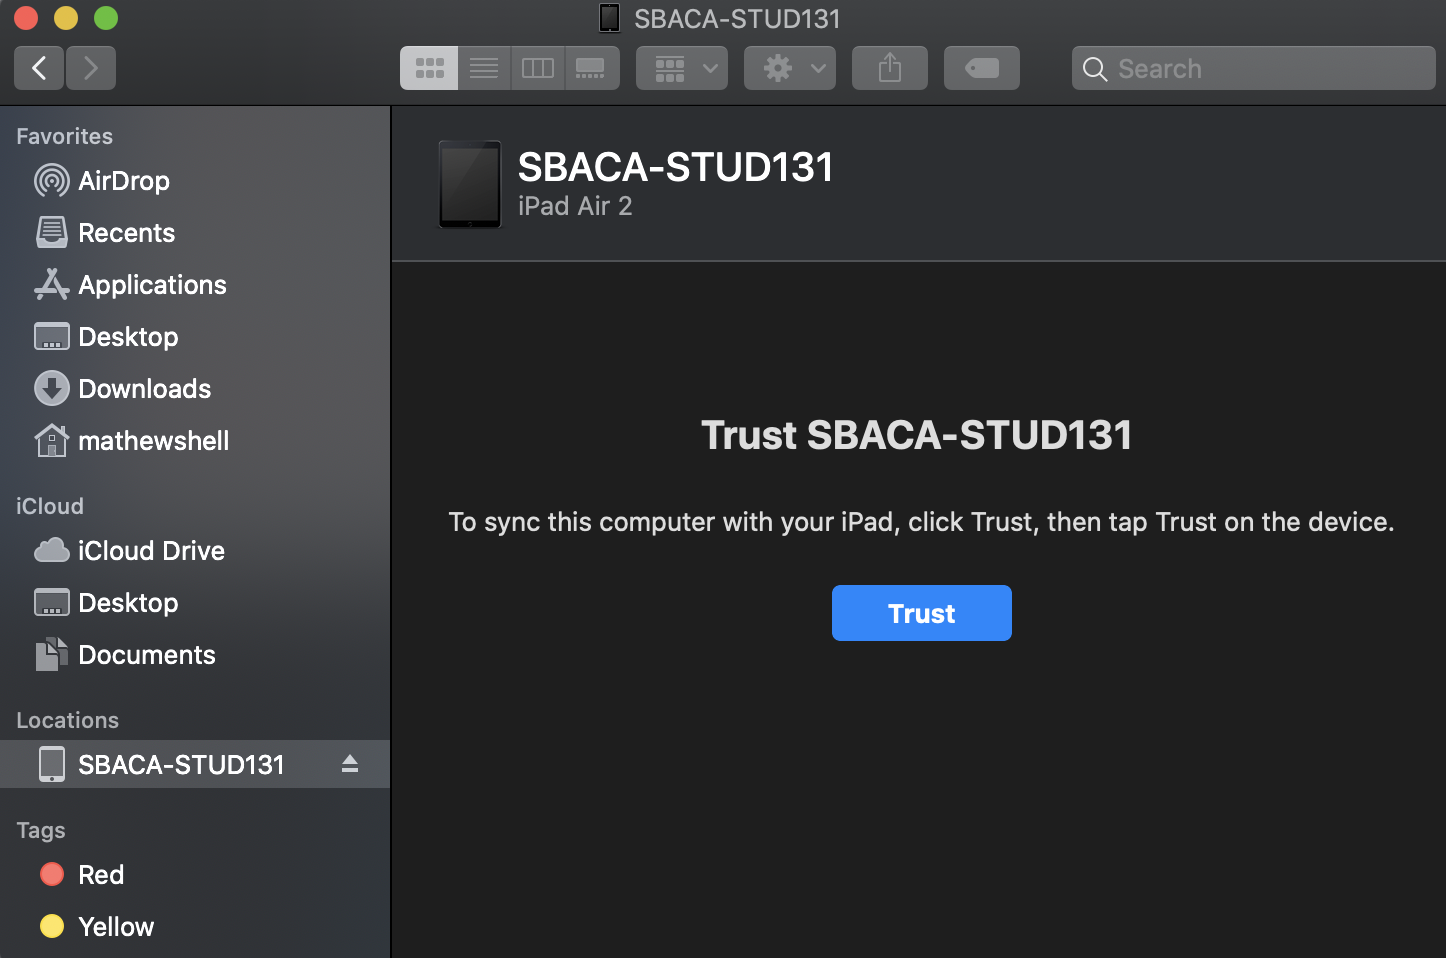
As soon as you connect the iPad to the computer, you will have to click a message on the computer saying you "Trust" the iPad; and there will be a similar message on the iPad asking you to confirm that you "Trust" the computer. You need to click/tap Trust at both messages. The message on your computer might be buried under other windows on your desktop, so if you don't see it right away, close out of as many other programs as possible.
The image below shows the Trust button on a Mac desktop in Finder.
The exact steps in the Restore process vary depending on your operating system, but most likely the computer will need to download the entire iPad software image before it can begin the restore and that will take at least 5-10 minutes (it could be much longer if you have a slow or highly utilized Internet connection). It might seem like nothing is happening while this is downloading, but if you look around on your desktop, you will probably find a slow-moving progress indicator showing how much of the download is remaining.
If you are having trouble initiating the restore, disconnect the iPad from the computer. Then power off the iPad. Then press and hold the home button on the iPad. While holding the home button, connect the USB cable. You should receive a prompt on the computer to Restore, and once that begins, then you can release the Home button.
It might ask you if you want to upgrade the iOS on the iPad and that is generally a good idea. If you are prompted, you should choose the option to Set Up As A New Device. It will probably ask you if you want to backup the iPad and you should say No (unless there is some data you really need to backup on the iPad). If you choose Yes to the backup, it will add an additional 10-20 minutes to the entire process.
This article provides additional info: https://support.apple.com/en-us/HT201252
Once the Restore is complete and the iPad is at the Hello screen, press the Home button and follow these steps:
- Select English as the language and United States as the Country. Then connect to a Wi-Fi network (if you use the cellular network the iPad might hang while installing apps and require you do Device Wipe again).
- Tap Continue or Next at the prompts. Choose Enable Location Services.
- When you get to the Home Screen, wait about 5 minutes for the Hub and other default apps to install.
- Open the hub app, tap I Understand (at the very bottom), then I Agree and login with the enrollment credentials (they are typically all CAPS).
- You may receive prompts asking you if you want to allow the Hub app to track your location; choose Allow or Always Allow.
- It will take between 10 and 30 minutes to finish installing all of the remaining apps. You can open the Catalog app to check the progress.
I just wiped an iPad, but I'm not sure which enrollment ID to use to re-enroll it.
It really doesn't matter which enrollment ID you use to log into each iPad. Each enrollment ID can only be used once, but if you wipe
an iPad the enrollment ID which was previously used for it becomes available. You can see a list of available enrollment IDs in
Workspace ONE by clicking Accounts (far left) then List View (under Users). Look for any username with a zero in the Devices column.
How can I take a screen capture on an iPad?
To take a screenshot on an iPad, press and hold the power button (the rectangular button on top of the iPad) and while you
are holding it down, press the Home button (round button at the bottom front of the iPad) and release them together. This will save the
image into the Photos app.
Can iPad users login with their own Apple ID? Should I have multiple users use a shared Apple ID?
Each school can decide if they would like students and/or teachers to login with an Apple ID. The main reason someone would want to login with their own ID
would be to download apps and/or make purchases. We recommend that you do not allow students to login, but you do allow teachers to login - that is now
the default profiles are configured, but you can change them if you like. If teachers do not need any apps other than the apps
you deploy, then they do not need to login with their own ID. But they certainly can if they want to.
I would strongly recommend against using shared Apple IDs. In order to create an Apple ID, it needs to be associated with a credit card and you would not be able to tell who made a purchase if the Apple IDs were shared.
I would strongly recommend against using shared Apple IDs. In order to create an Apple ID, it needs to be associated with a credit card and you would not be able to tell who made a purchase if the Apple IDs were shared.
Our school acquired several iPads from somewhere other than DeSales Media. Is it possible for us to add them to Workspace ONE so they can be managed with our existing iPads?
Unfortunately, no. Our licenses for Workspace ONE are paid for with a grant and we cannot "mix" non-grant licenses into our account.
Here are a few options for managing your other iPads:
Here are a few options for managing your other iPads:
- You could create an Apple ID and use it to log into up to ten iPads. Then you can go to https://icloud.com, login with that Apple ID, download an app, and it will be deployed to all of the iPads which are logged in with that account. The downside is that if you have 50 iPads, you will need five different Apple IDs. Also, you would not be able to prevent a user from installing their own apps on each of the iPads.
- You could use another Mobile Device Manager (MDM) tool. Some schools use JAMF which requires a paid license which starts at $2 per device per month.
App Installation: Sign in to iTunes to allow ds420.awmdm.com to manage and install the apps.
This message typically indicates that an app is assigned to this iPad which requires the user login with an Apple ID. To determine which app is
causing the issue, navigate to Devices, List View, find the device and click on the device name, click the More dropdown
and choose Troubleshooting. When the next window pops up, you should see the name of the app in the log messages.
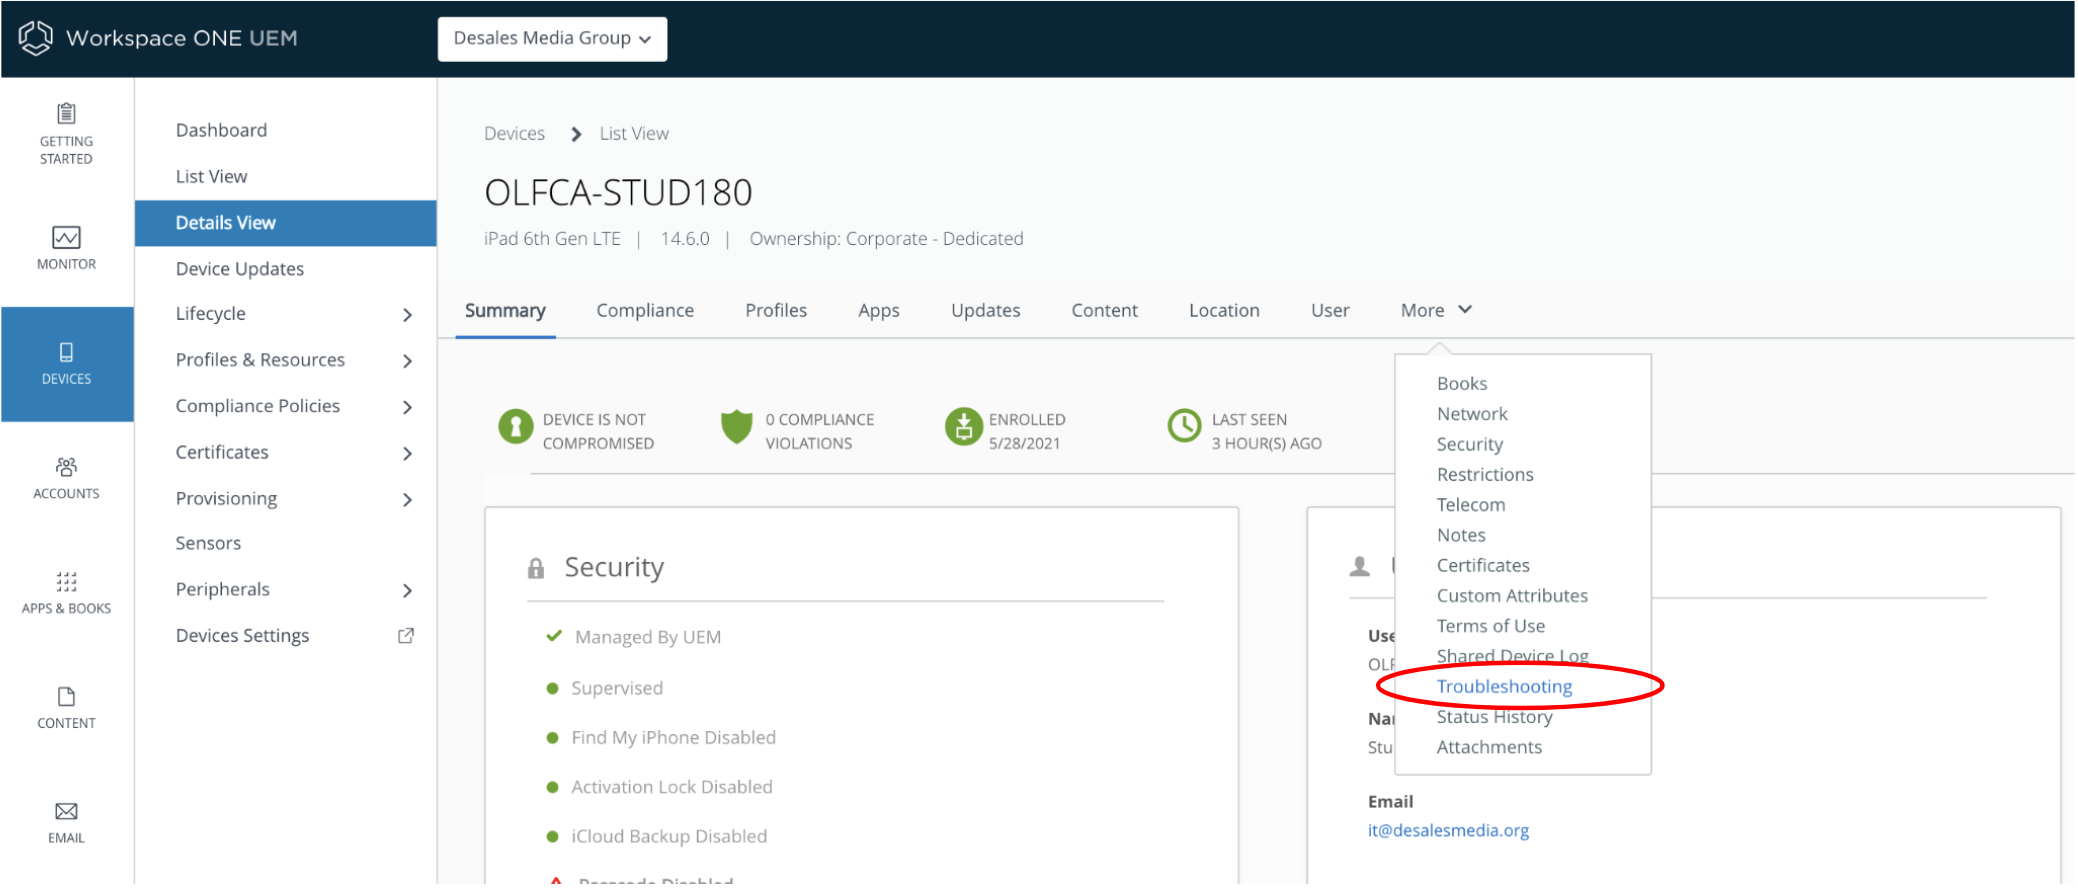
Two possible reasons and their resolutions:
Two possible reasons and their resolutions:
- An app is configured for User Assignment and not Device Assignment.
By default, all app are assigned based on the Apple iTunes ID. Because the iPads prevent students from logging in with an Apple iTunes ID, the
apps cannot deploy until you click the button to Enable Device Assignment. To do that, Click Apps & Books (in the menu on the left),
choose Applications, Native, and
then click Purchased. Click on the name of the app, then click the Enable Device Assignment button. Then click Save.
- An app is deployed as a Public app (apps should only be deployed as Purchased apps after they are purchased in Apple School Manager). To remove the Public app assignment, Click Apps & Books (in the menu on the left), choose Applications, Native, and then click Public. Click on the name of the app, then click Assignments. Removing the assignment can be a bit tricky, depending on how it was assigned, but if you click around, you should be able to figure out how to remove it. If you cannot remove it, send an email to ipads@desalesmedia.org and give us the name of the app.